---
title: "Blocks"
space: "Framework"
url: "https://docs.frappe.io/framework/user/en/printing/print-format-editor/blocks"
updated: "2026-10-10"
---
Blocks are the things you put on a print format that are not fields of the document: a heading, a logo, a QR code, a value from the customer record, or a piece of your own HTML. This page explains every block, its settings, and what it prints.
Applies to Frappe v16 and later.
## Adding a block
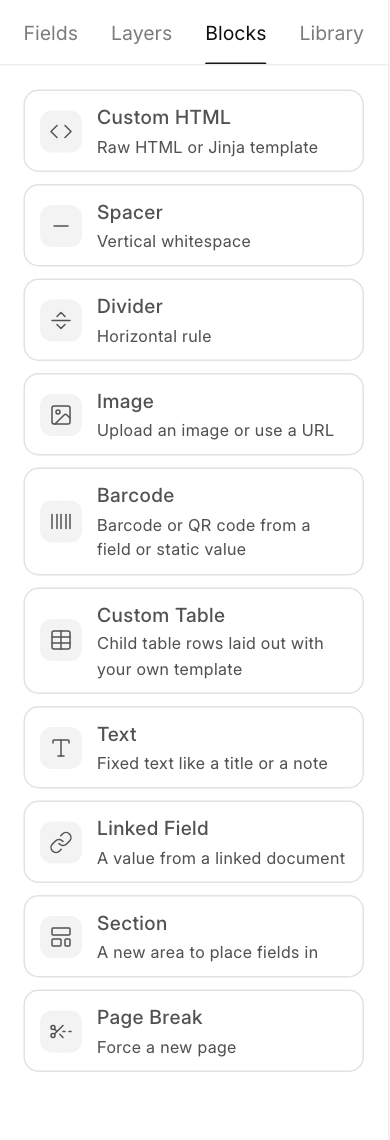
Open the **Blocks** tab in the left panel. Then either:
- **drag** the block to where you want it on the page, or
- **click** it. It is added below the selected field. With nothing selected, it goes into the last section.
Once placed, a block is selected like any field. Its settings appear in the right panel, and every block has **Custom CSS** and **Visibility** at the bottom, so you can style it or [print it only sometimes](/framework/user/en/printing/print-format-editor/conditions).
## Which blocks are available
| Block | Use it for |
|-------|------------|
| [Text](#text) | Fixed text: a title, a note, a thank you line |
| [Image](#image) | A logo, a stamp, a signature, any picture |
| [Barcode](#barcode) | A barcode or QR code from a field or a fixed value |
| [Linked Field](#linked-field) | A value from a linked document, such as the customer's tax ID |
| [Custom Table](#custom-table) | Child table rows laid out with your own template |
| [Spacer](#spacer) | Empty vertical space |
| [Divider](#divider) | A thin horizontal line |
| [Custom HTML](#custom-html) | Your own HTML and Jinja, for anything the other blocks cannot do |
| [Typst](#typst) | Your own Typst markup. Replaces Custom HTML when the PDF renderer is Typst. |
| [Section](#section-and-page-break) | A new section to place fields in |
| [Page Break](#section-and-page-break) | Start a new page |
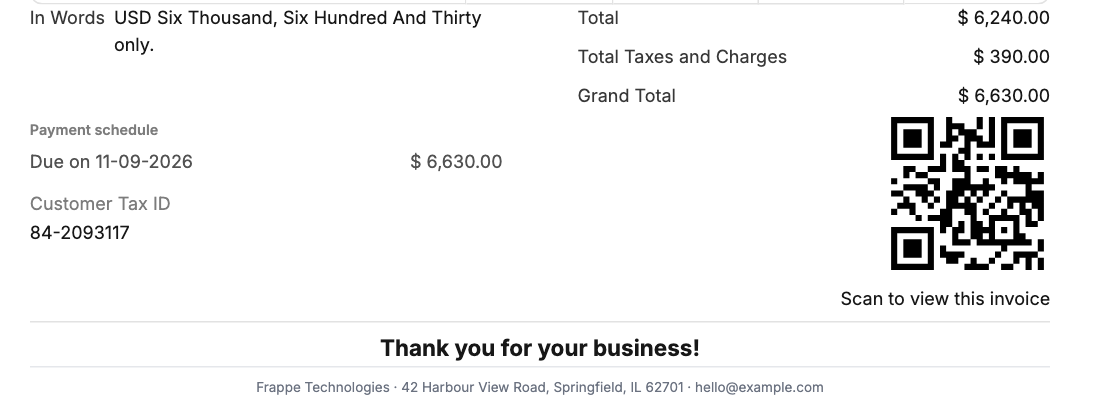
Here is what a few of them look like at the bottom of an invoice: a Custom Table with the payment schedule, a Linked Field with the customer's tax ID, a QR code, a Divider and two Text blocks.
The list depends on the format's **PDF renderer**. With **Chromium** (the default) you see **Custom HTML**. With **Typst** you see **Typst** in its place. See [Page settings and PDF renderer](/framework/user/en/printing/print-format-editor/page-settings).
## Text
Prints fixed text that does not come from the document, such as "Thank you for your business" or "Goods once sold will not be taken back".
| Setting | What it does |
|---------|--------------|
| **Text** | The text to print. Press Enter for a new line. |
| **Bold** | Prints the text in bold. |
| **Font size** | Size in pixels. Leave empty for the page font size. |
| **Align** | left, center or right. |
The text is printed as it is. It is translated into the print language when a translation exists, but it cannot contain field values. To print a document value inside a sentence, use a [Custom HTML](#custom-html) block.
## Image
Prints a picture: a logo, a payment QR image, a signature or a stamp.
| Setting | What it does |
|---------|--------------|
| **Upload Image** | Upload a picture from your computer. It is saved in **Home/Attachments**. After an upload the button reads **Change Image**. |
| **or image URL** | Use a picture from a web address instead of uploading. |
| **Clear** | Removes the picture. |
| **Size** | The width, from 20 to 700 pixels. A new image starts at its own width, up to 300 pixels. |
| **Align** | left, center or right. |
The image is the same on every printout. To print an image that changes with the document, such as the item image, add the document's image field from the **Fields** tab, or use a [Linked Field](#linked-field) pointing at an image field.
> **Note:** the Typst renderer cannot load images from a web address. Upload the image instead if you use Typst.
## Barcode
Prints a barcode or a QR code, for example the invoice number as a barcode, or a payment link as a QR code.
| Setting | Options | What it does |
|---------|---------|--------------|
| **Value from** | **Static value**, **ID (name)**, or any field of the document | Where the barcode's value comes from. **ID (name)** uses the document's number, for example `ACC-SINV-2026-00006`. |
| **Value** | text | The fixed value to encode. Only shown when **Value from** is **Static value**. |
| **Format** | **CODE128**, **CODE39**, **QR** | **CODE128** is the usual choice for numbers and letters. **CODE39** is for older scanners. **QR** makes a square QR code. |
| **Size** | 40 to 500 pixels | The width of the code. |
| **Value text** | on, off | Prints the value in plain text under the barcode. Not shown for QR codes. |
| **Align** | left, center, right | |
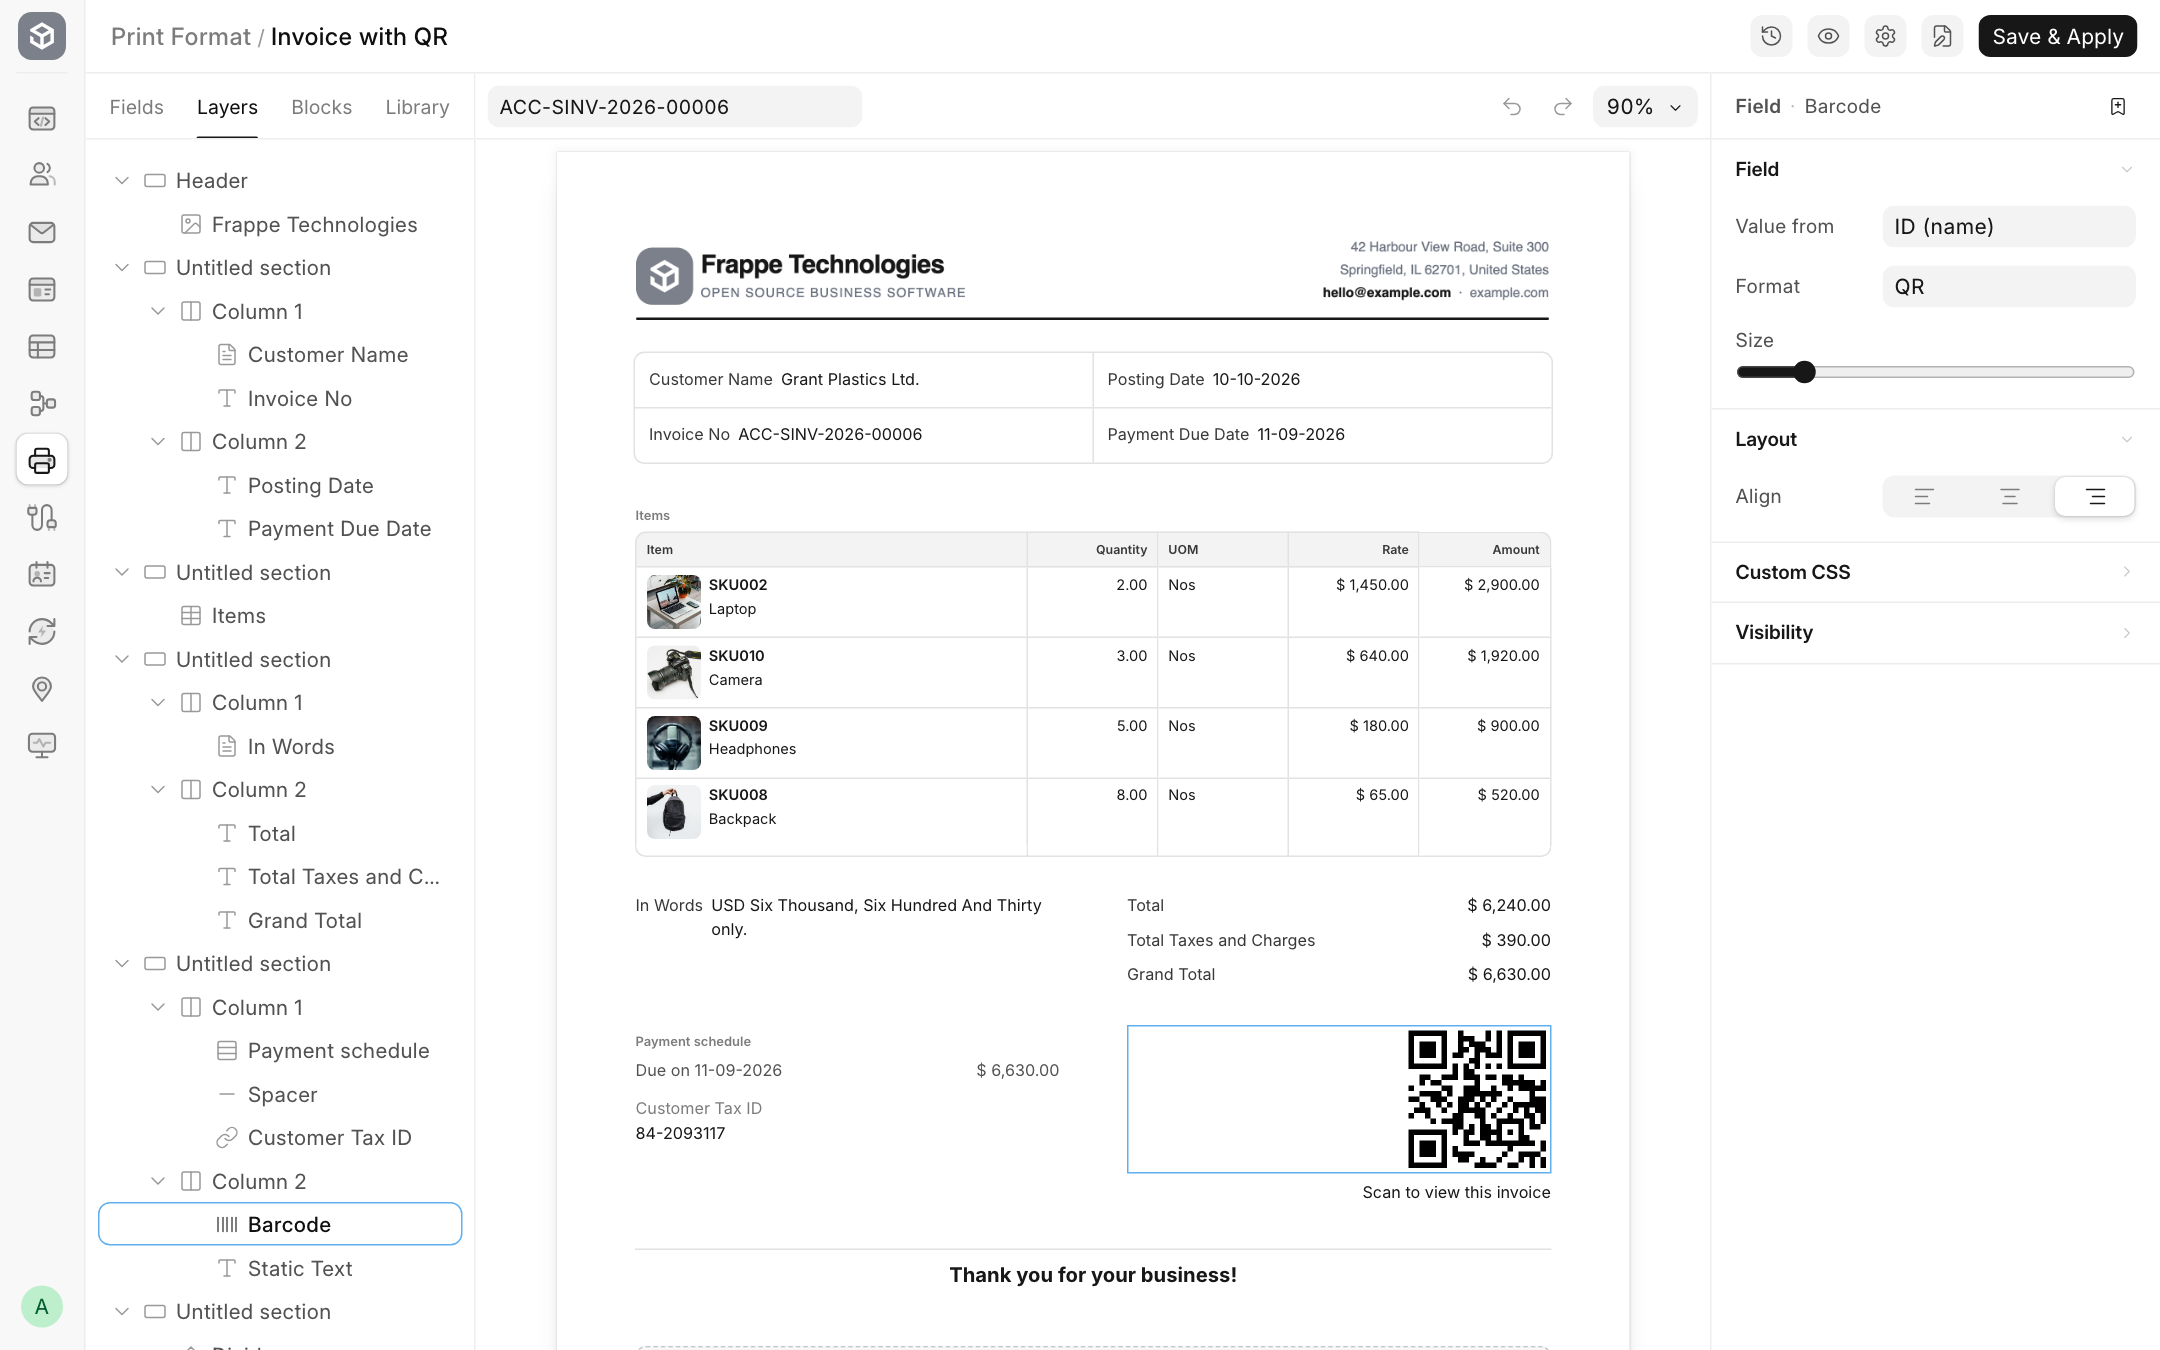
A QR code can hold up to 2000 characters, so a full web address fits.
If the document already has a **Barcode** field, you can drag that field in from the **Fields** tab instead. Its format comes from the field's own settings, and only **Size** can be changed.
> **Note:** the Typst renderer prints QR codes only. Use Chromium for CODE128 or CODE39 barcodes.
## Linked Field
Prints a value from a document that this document links to. For example, a Sales Invoice links to a Customer, so you can print the customer's tax ID or territory without adding a field to the invoice.
| Setting | What it does |
|---------|--------------|
| **Link** | The link field to follow, shown with the document type it points to, for example **Customer (Customer)**. |
| **Field** | The field to print from the linked document, for example **Tax Id**. The block's label is set to this field's label. |
| **Label** and **Show label** | The label printed next to the value. |
| **Size** | Only when the linked field is an image. The width of the image. |
It also has the usual **Bold**, **Font size**, colour and **Align** settings, and one setting that plain fields do not have:
| Setting | What it does |
|---------|--------------|
| **Print if empty** | Prints the label even when the linked value is empty. Turn it on for forms where the space must always be there, such as "Vehicle No." on a delivery note. |
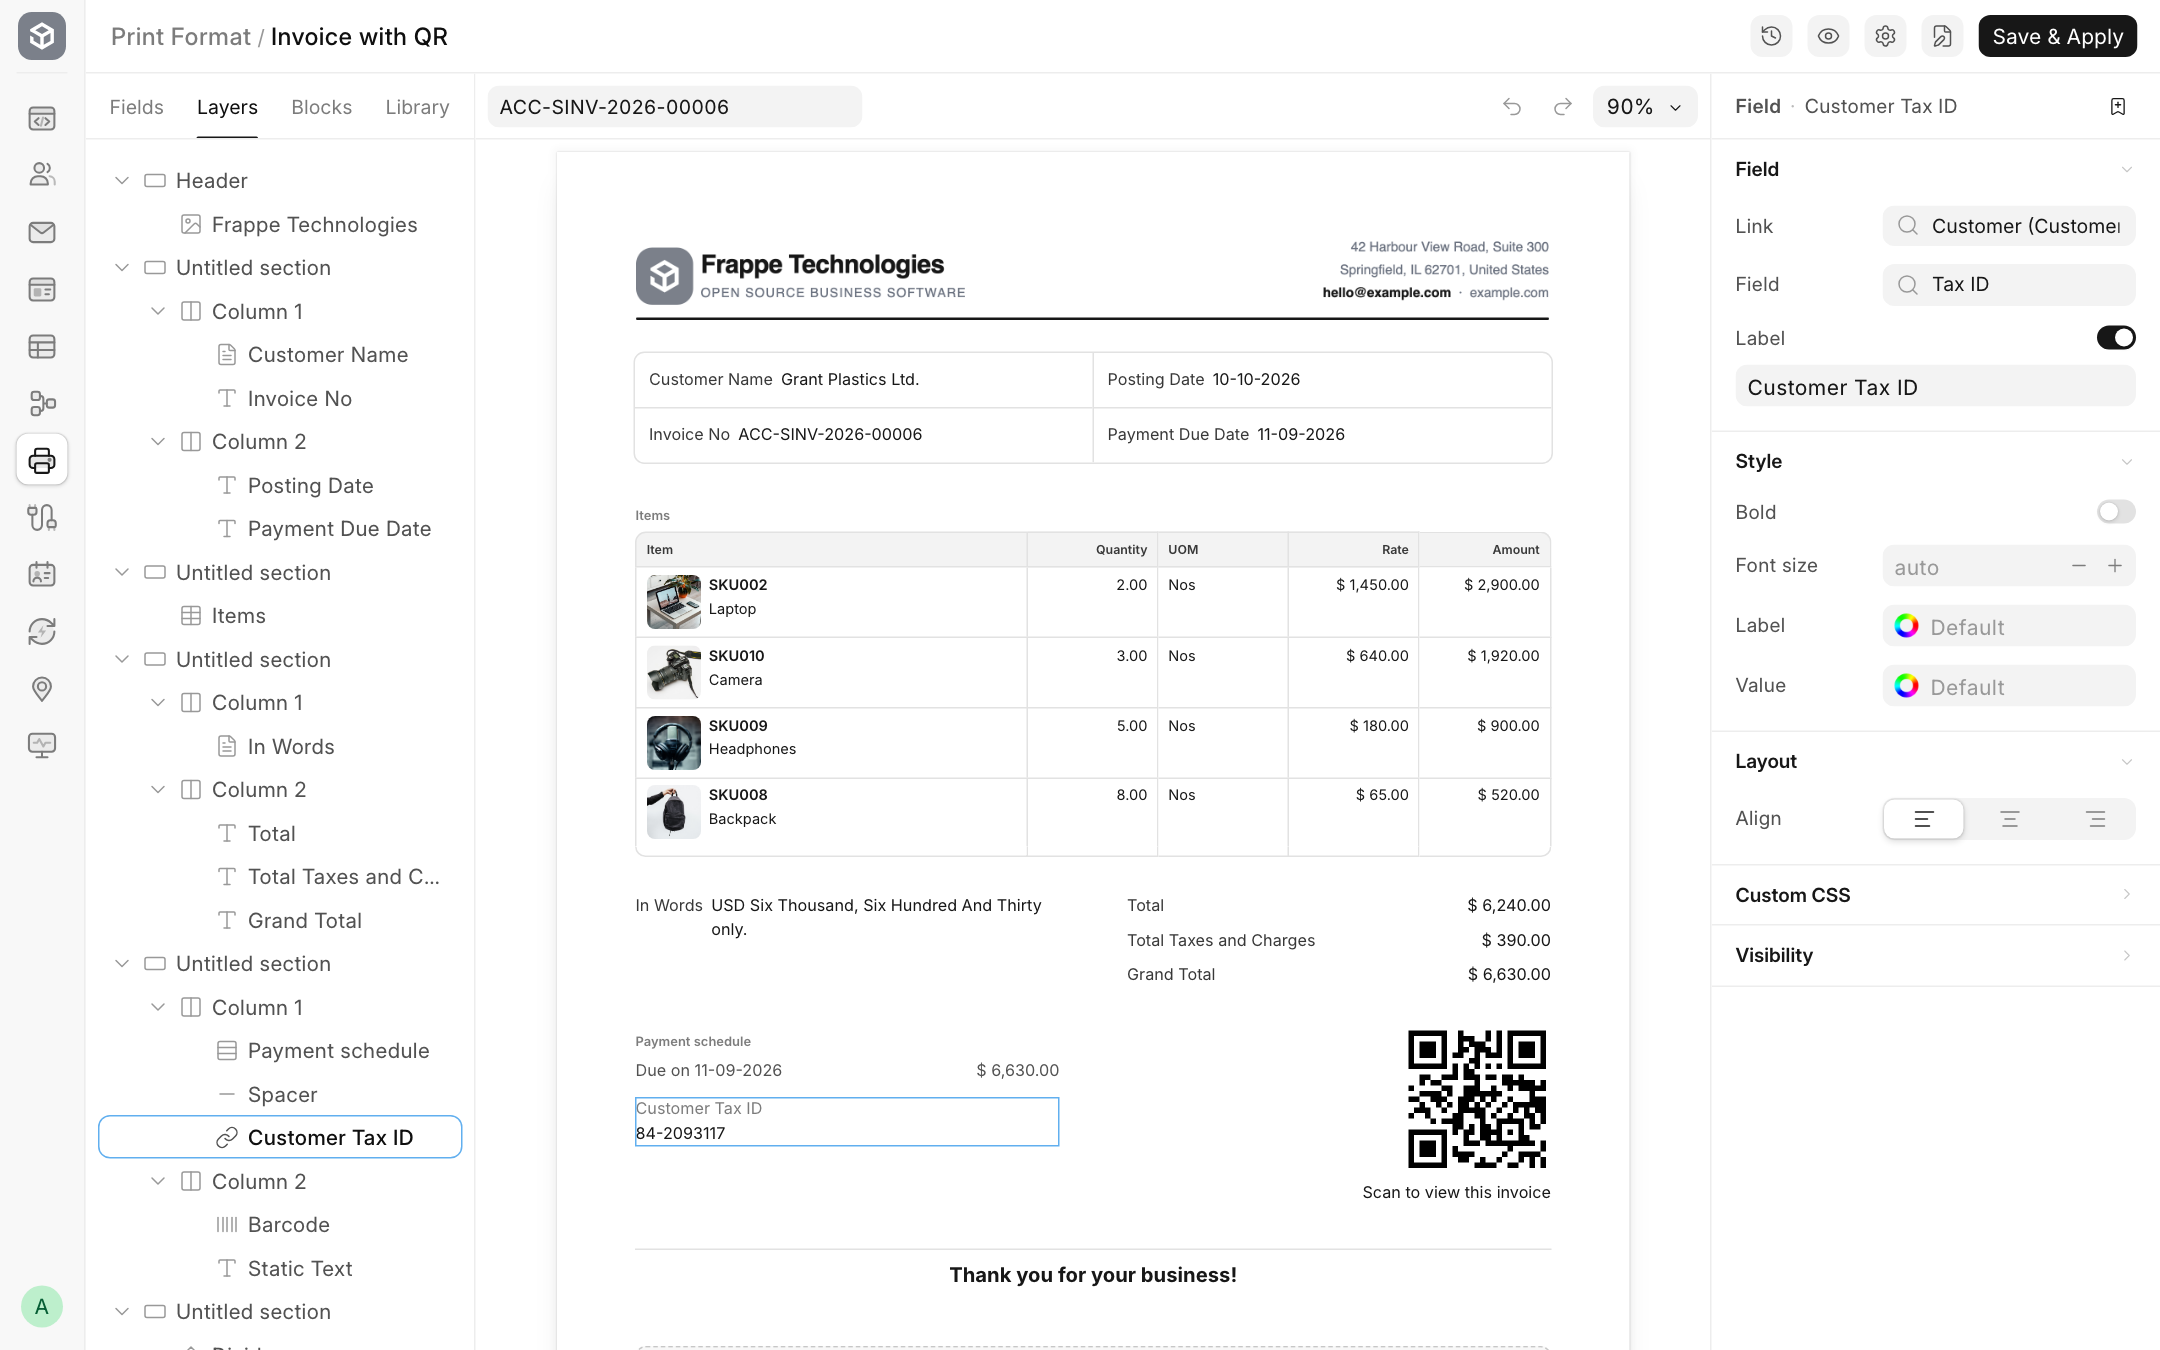
Linked Field follows one link only. The person printing must be allowed to read the linked document, otherwise the value is left out.
## Custom Table
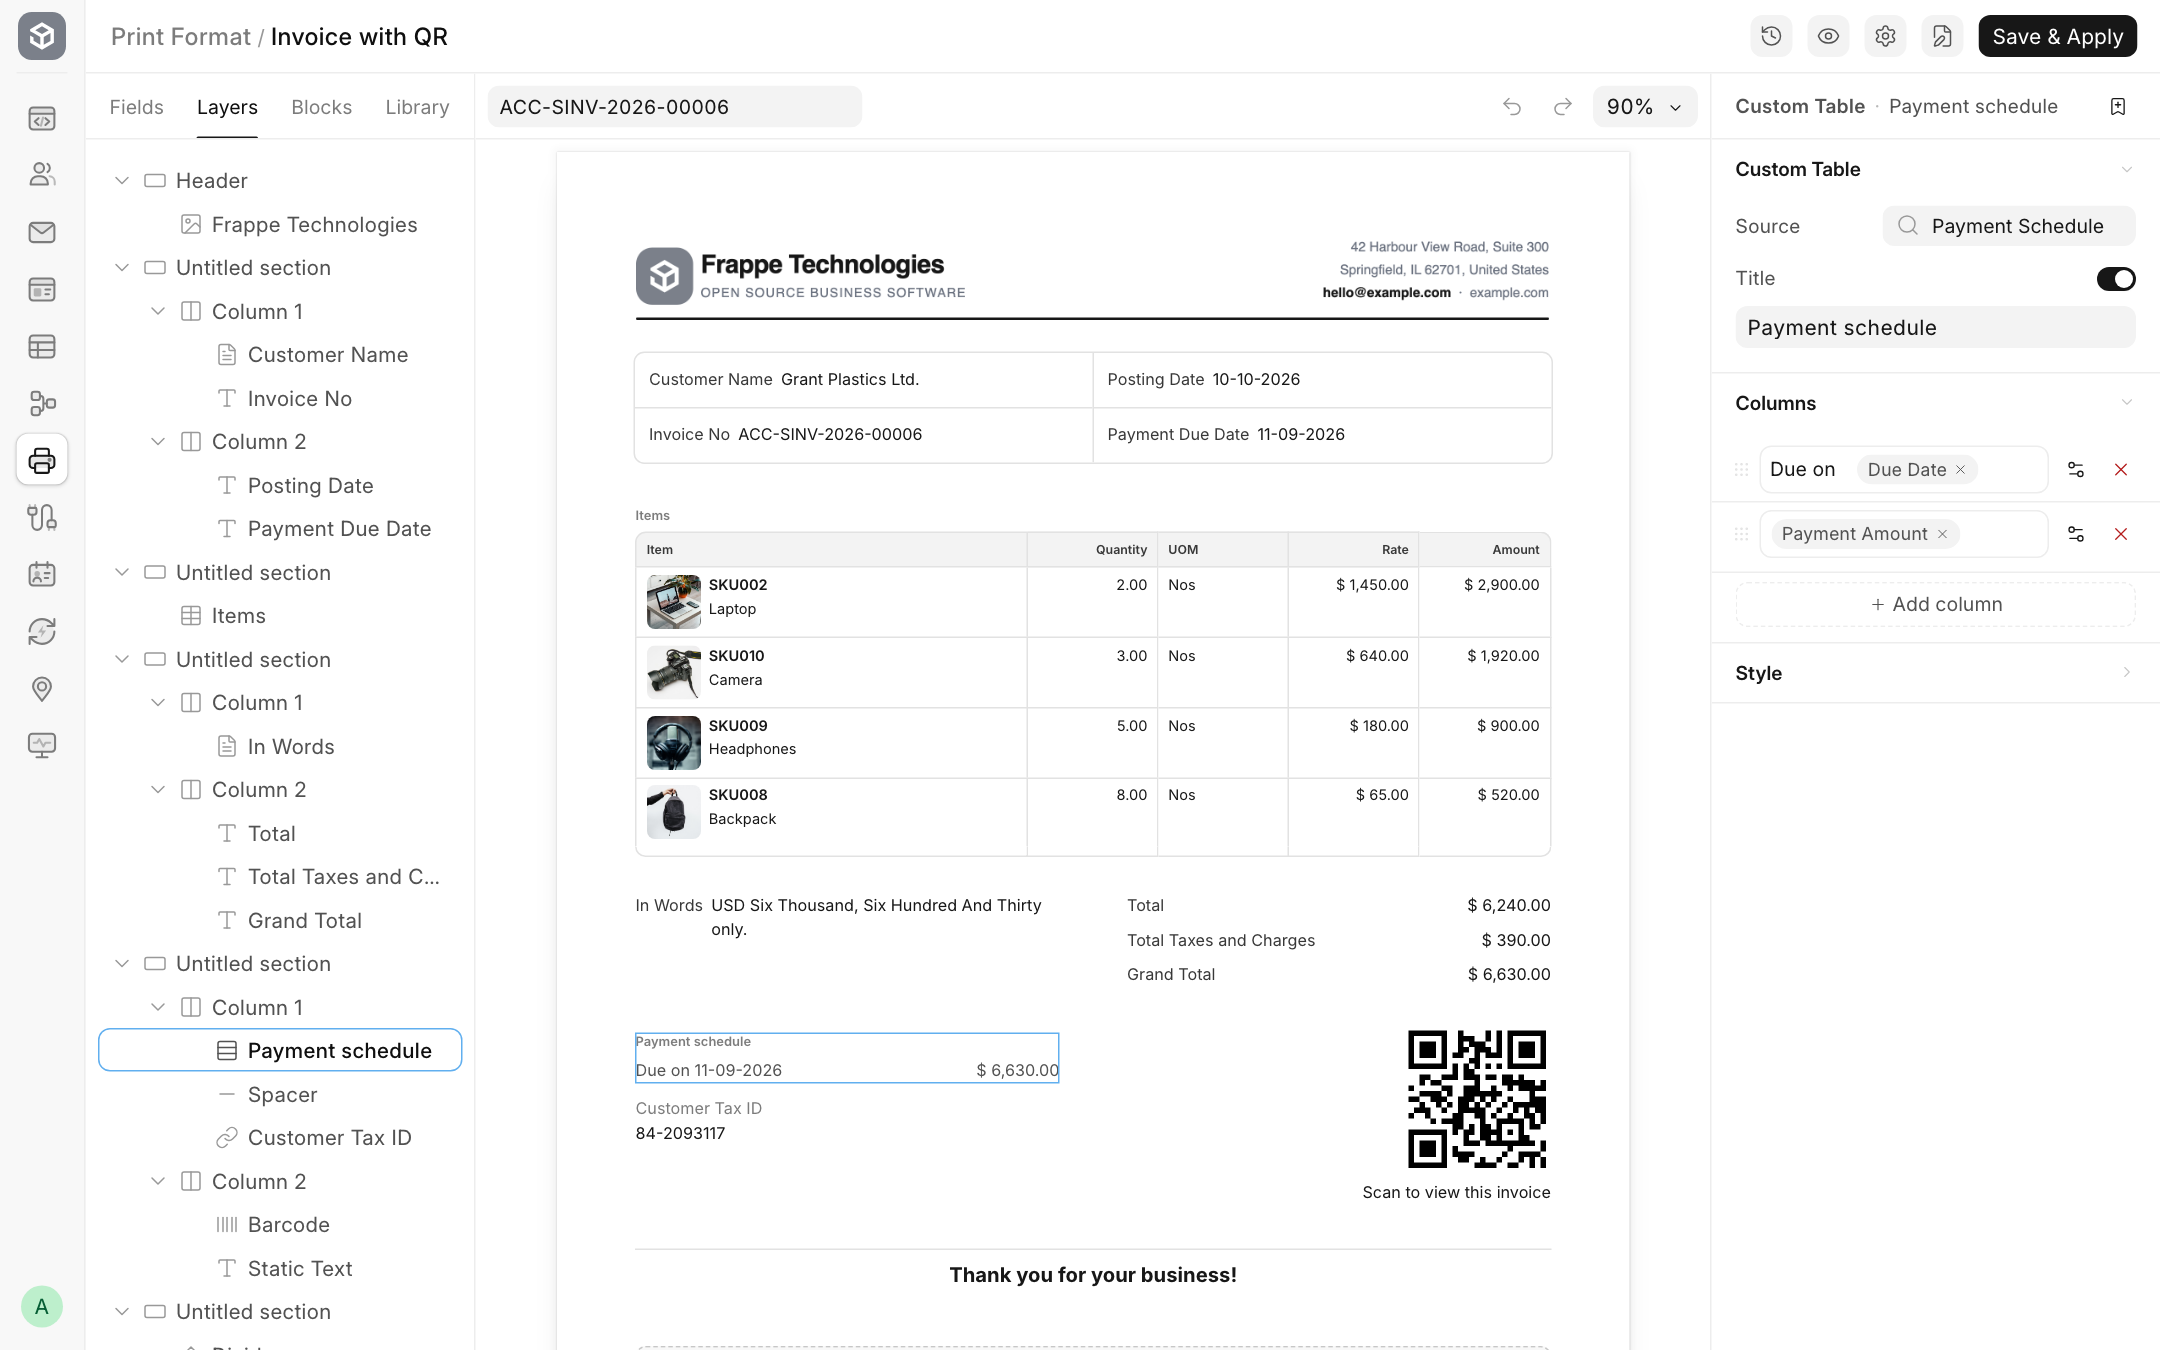
Prints the rows of a child table with your own layout instead of a grid. Use it when a normal table is too heavy, for example a compact list of payment terms, or a list of serial numbers.
### Settings
| Setting | What it does |
|---------|--------------|
| **Source** | The child table to print, for example **Payment Schedule**. |
| **Title** and **Show title** | An optional heading above the rows. |
| **Columns** | Each row prints as these columns. Every column has a template. Click **Add column** to add one. |
Click the settings button next to a column to set its **Width** (percent), **Align** and **Colour**.
### Writing a column template
A template mixes your own text with fields of the row:
1. Click in the column's template box.
2. Type plain text, for example `Due on `.
3. Type `/` to open the list of the row's fields. Keep typing to filter it, then press **Enter** to insert the field. It shows as a small badge.
4. Carry on typing, and add more fields the same way.
For a payment schedule, two columns like these:
| Column | Template |
|--------|----------|
| 1 | `Due on` **due_date** |
| 2 | **payment_amount** |
print one line per row:
```
Due on 09-11-2026 $ 3,315.00
Due on 09-12-2026 $ 3,315.00
```
Use **Backspace** to delete the badge before the cursor. Fields print formatted, so dates, currency and numbers look the same as everywhere else.
When the source table has no rows, nothing is printed.
## Spacer
Adds empty vertical space between two things.
| Setting | What it does |
|---------|--------------|
| **Height** | The space in pixels. A new spacer is 10 pixels. |
## Divider
Draws a thin grey line across the column. It has no settings of its own. Use **Custom CSS** to change it, for example `border-bottom: 2px solid #111827;`.
## Custom HTML
Prints your own HTML. Use it for anything the other blocks cannot do: a sentence that mixes several values, a signature box, a terms block with special formatting.
Select the block and click **Edit HTML**. The editor opens with your HTML on the left and a live preview on the right, using the document you picked for the preview.
You can use [Jinja](https://jinja.palletsprojects.com/en/stable/templates/) to print values. The document is available as `doc`:
```html
Thank you, {{ doc.customer_name }}, for your order
{{ doc.po_no or "" }}.
Amount due: {{ doc.get_formatted("grand_total") }}
```
Child table rows are available as lists:
```html
{% for row in doc.items %}
- {{ row.item_name }}: {{ row.get_formatted("amount") }}
{% endfor %}
```
Things to know:
- Use `doc.get_formatted("fieldname")` to print a value the way the form shows it, with currency symbols and date formats.
- `frappe` utilities that are safe for templates are available, for example `frappe.format_date(doc.posting_date)` and `frappe.db.get_value("Customer", doc.customer, "tax_id")`. See [Jinja API](/framework/user/en/api/jinja).
- For safety, scripts, styles, forms, iframes and event handlers such as `onclick` are removed when you save. Put styles in the block's **Custom CSS** or the page's **Custom CSS** instead.
- A section that contains a Custom HTML block always prints, even if the block prints nothing.
> **Note:** a format with a Custom HTML block cannot use the Typst renderer.
## Typst
Only shown when the format's **PDF renderer** is **Typst**. It takes the place of Custom HTML and prints your own [Typst](https://typst.app/docs/) markup.
Type the markup in the block's text box, or click **Edit Typst** on the page. Use `{{ doc.fieldname }}` for values from the document:
```typst
#text(weight: "bold", size: 14pt)[Thank you, {{ doc.customer_name }}]
Amount due: *{{ doc.get_formatted("grand_total") }}*
```
Things to know:
- Values are escaped for Typst, so a customer name with `#` or `*` prints as it is. To insert raw Typst markup from a value, write `{{ value | typst_raw }}`.
- Jinja tags such as `{% for row in doc.items %}` work too.
- The editor page shows a placeholder for this block. Click **Show Preview** to see the result in the PDF.
- When you save, the markup is checked against a real document. If it has an error, the save stops and tells you what is wrong.
- A format with a Typst block can only use the Typst renderer. To go back to Chromium, remove the block first.
## Section and Page Break
These two are at the end of the Blocks tab:
- **Section** adds a new section below the selected one. See [Sections, columns and the page](/framework/user/en/printing/print-format-editor/layout).
- **Page Break** adds a page break. Everything after it starts on a new page. Click **Remove page break** on the page to take it out.
## Save blocks for reuse
Set up a block once and reuse it in other formats: select it and click the bookmark button at the top of the right panel, or right-click it and choose **Save as snippet**. It then appears in the **Library** tab. See [Versions, snippets and shortcuts](/framework/user/en/printing/print-format-editor/versions-snippets-shortcuts).
## Related topics
- [Fields](/framework/user/en/printing/print-format-editor/fields)
- [Show or hide content](/framework/user/en/printing/print-format-editor/conditions)
- [Page settings and PDF renderer](/framework/user/en/printing/print-format-editor/page-settings)