


















Produce an Item at Each Operation
Note: Available from ERPNext version 16. This feature was earlier called
Track Semi Finished Goods. Only the names on the screen changed, so your existing BOMs, Work Orders and Job Cards keep working.
Some products are made in stages. A steel box, for example, is first cut from a steel sheet, and the cut sheet is then painted into the finished box. Each stage makes an item of its own, and that item goes into stock before the next stage uses it.
Tick Produce an Item at Each Operation on a BOM when you want ERPNext to work this way:
- every operation (step) of the BOM has its own Output Item, such as a cut sheet;
- every step has its own raw materials, which can include the item an earlier step made;
- when a step's Job Card is done, its raw materials are consumed and its Output Item is added to stock;
- the last step makes the item of the BOM itself.
You can see and use the stock of every in-between item, and every Job Card shows what it consumes and what it makes.
When to use it
| Use it when | You may not need it when |
|---|---|
| An in-between item is stored, counted or sold on its own | The whole item is made in one go |
| Different people or machines make each stage, at different times | You only need the time and cost of each operation |
| Stock reports should show work that is half done | All raw materials are consumed together at the end |
The example on this page
A company sells Demo Steel Box. It is made in two steps:
| Step | Operation | Output Item | Raw materials for 1 Demo Steel Box |
|---|---|---|---|
| 1 | Demo Cutting | Demo Cut Sheet | 2 Nos Demo Steel Sheet |
| 2 (Last Step) | Demo Painting | Demo Steel Box | 1 Nos Demo Cut Sheet and Demo Paint |
The steps below make a Work Order for 5 Demo Steel Box, so step 1 needs 10 Demo Steel Sheet.
How it works
- Set up the BOM. Add the operations, tick Produce an Item at Each Operation, and give every step its Output Item and raw materials.
- Make a Work Order. When you submit it, ERPNext makes one Job Card for every step.
- Work through the Job Cards in order. The step guide at the top of each Job Card shows what to do next: Move Materials, Start Job, Complete Job, Submit.
- Record the output. After submitting a Job Card, click Record Output. This consumes the raw materials of the step and puts its Output Item into stock.
- Repeat for the next step. The next step uses the item the previous step made. When the output of the Last Step is recorded, the Work Order is completed.
Step 1: Set up the BOM
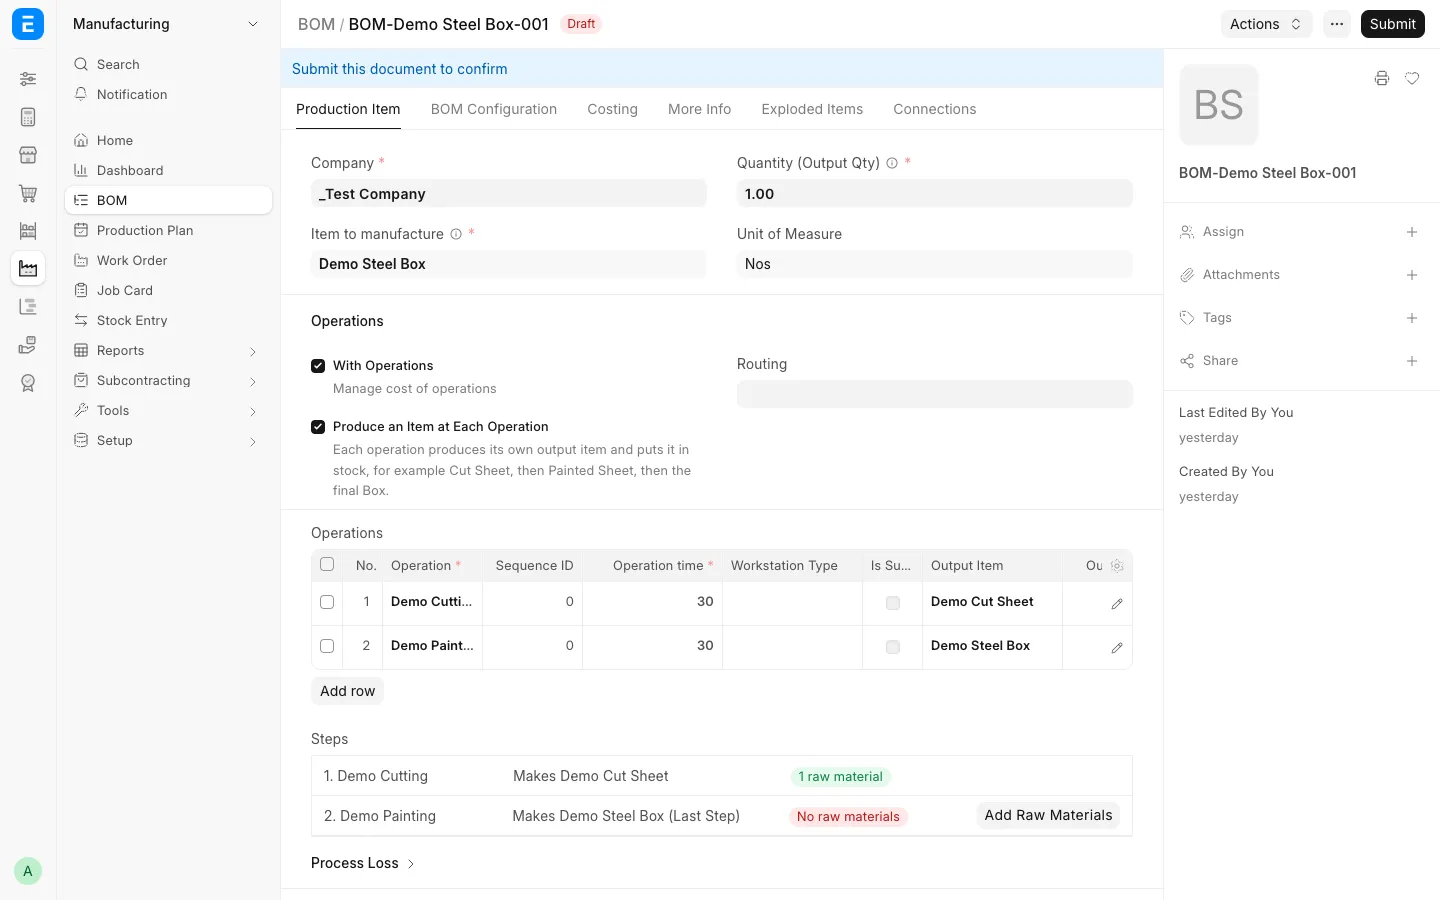
- Create a new BOM for the item you sell, for example Demo Steel Box.
- Tick With Operations and Produce an Item at Each Operation.
- In the Operations table, add one row for every step, in the order the work happens: Demo Cutting, then Demo Painting.
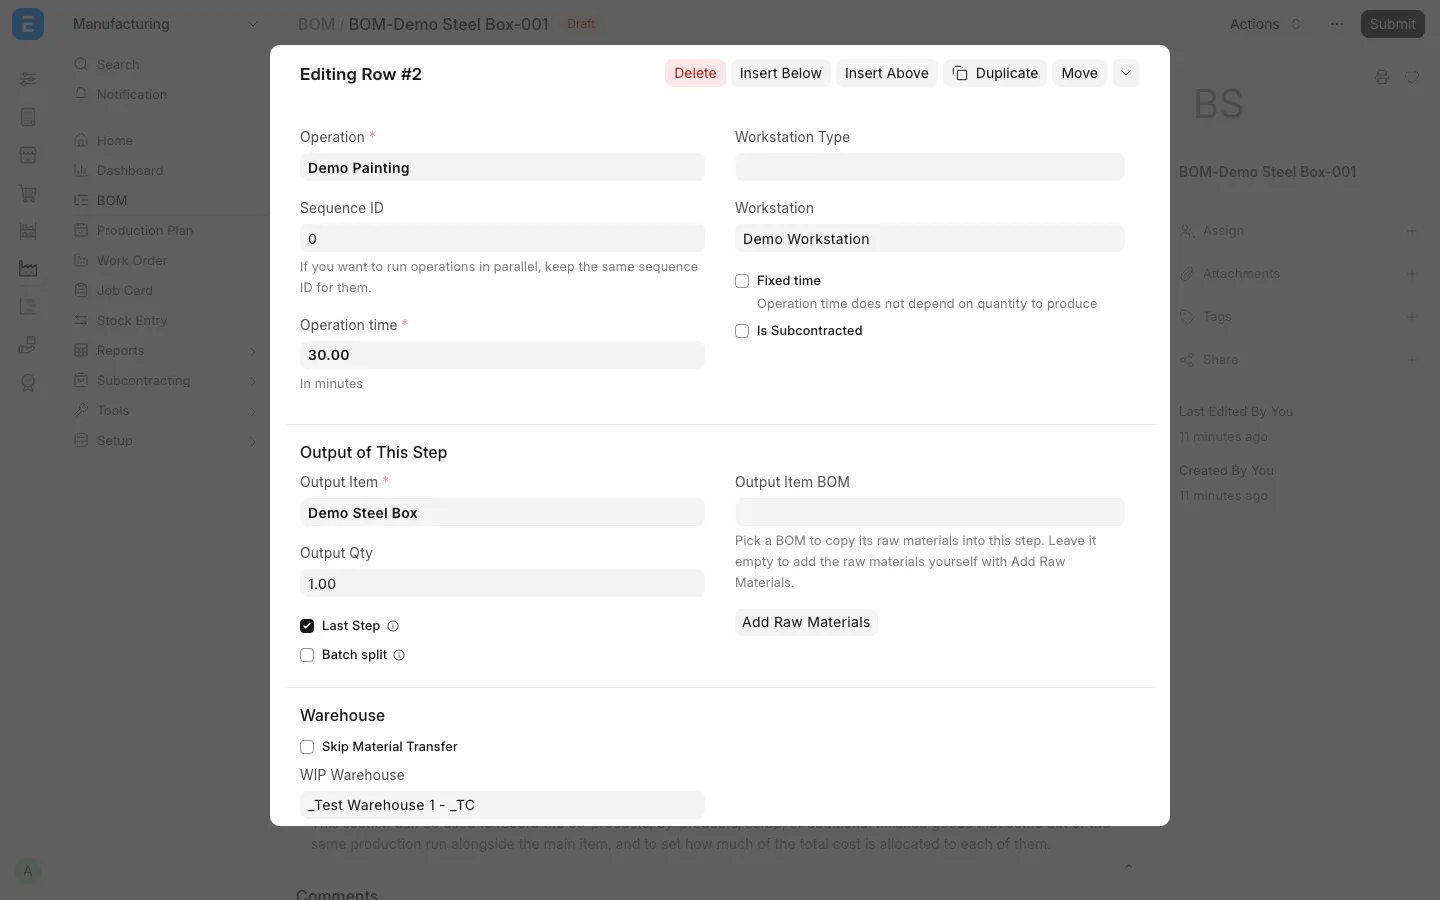
- Click the edit icon on each row and fill in Output of This Step:
- Output Item: the item this step makes, for example Demo Cut Sheet.
- Output Qty: how many of it this step makes for one unit of the BOM's item.
- Output Item BOM (optional): a submitted BOM of the Output Item. Its raw materials are copied into this step.
- Last Step: tick this on the step that makes the BOM's own item. The other steps make in-between items.
- Give every step its raw materials, in one of two ways:
- choose an Output Item BOM, or
- click Add Raw Materials on the step, or next to it in the Steps list, and pick the items and quantities yourself.
- Save, check the Steps list, and submit the BOM.
The Steps list
The Steps list under the Operations table shows, for every step, the item it makes and whether it has raw materials:
| Status | Meaning |
|---|---|
| 1 raw material, 2 raw materials (green) | The step has its own raw materials |
| From BOM (blue) | The raw materials come from the Output Item BOM |
| No raw materials (red) | Nothing would be consumed at this step. Click Add Raw Materials next to it |
In the example, Demo Painting shows No raw materials until you add Demo Cut Sheet and Demo Paint to it.
Last Step is ticked for you
If you save without ticking Last Step on any step, ERPNext ticks it for you:
- on the step whose Output Item is the BOM's item, when exactly one step makes it, or
- on the last step, when it has no Output Item yet. Its Output Item is then set to the BOM's item.
Fix These Steps
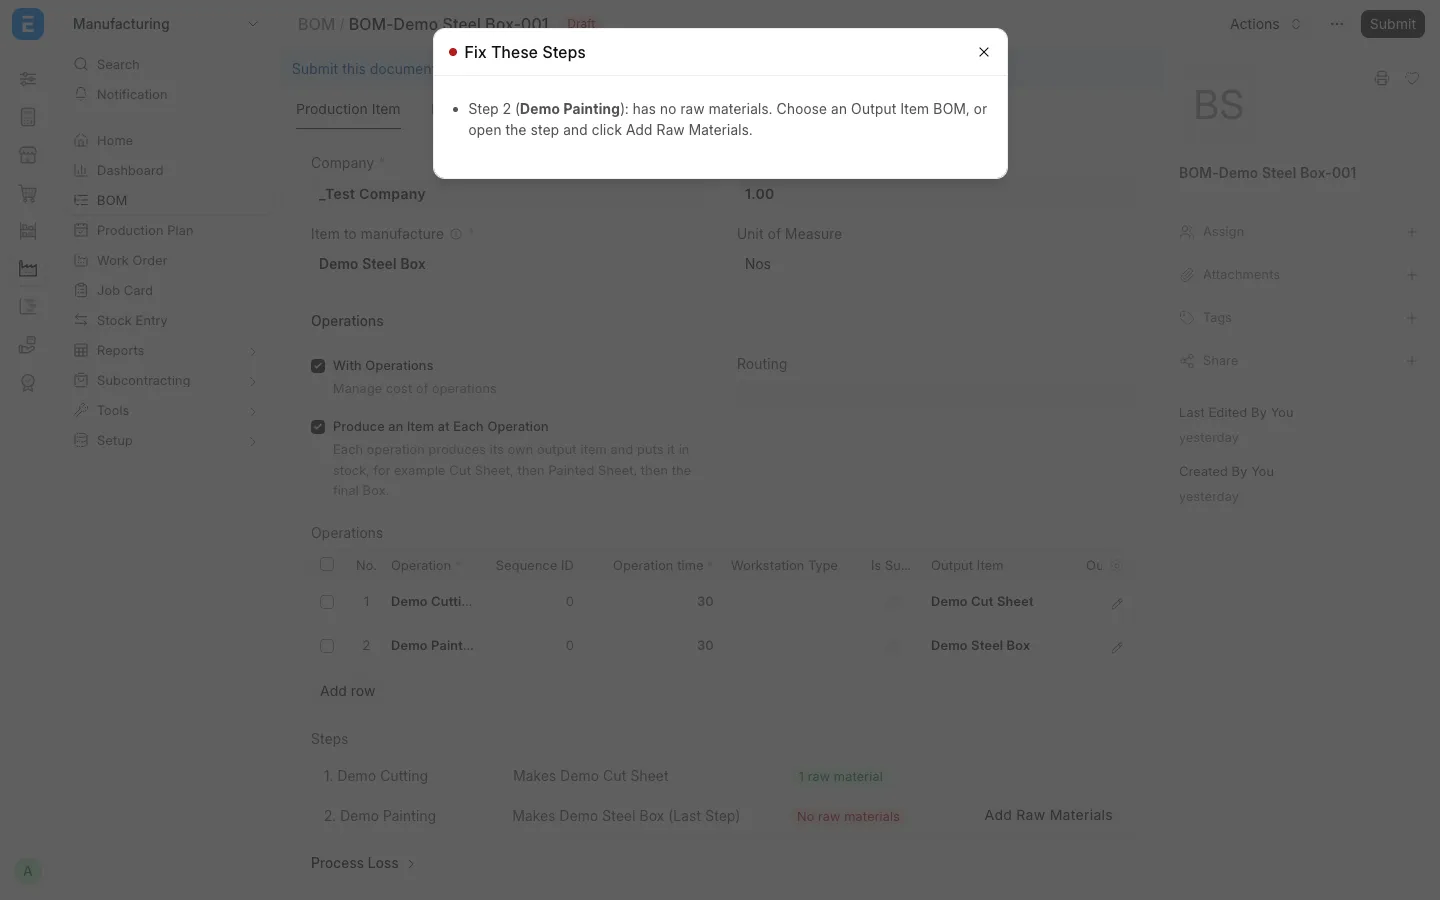
When something is missing, ERPNext shows one Fix These Steps message that lists every problem at once, and each line says what to do:
| Message | What to do |
|---|---|
| Step 2 (Demo Painting): choose the Output Item, that is the item this step makes. | Open the step and set its Output Item |
| Step 2 (Demo Painting): this is the Last Step, so its Output Item must be Demo Steel Box. | Set the Output Item to the BOM's item, or untick Last Step |
| Tick Last Step on the step that makes Demo Steel Box. Its Output Item must be Demo Steel Box. | Tick Last Step on the final step |
| Only one step can be the Last Step, but it is ticked on steps 1, 2. | Untick Last Step on every step except the final one |
| Step 2 (Demo Painting): has no raw materials. Choose an Output Item BOM, or open the step and click Add Raw Materials. | Give the step its raw materials. This one is checked when you submit |
On each step you can also set the source, work in progress and finished goods warehouses, tick Skip Material Transfer, and mark the step as subcontracted. For a subcontracted step, you can create a Subcontracting Purchase Order from its Job Card.
Step 2: Make the Work Order
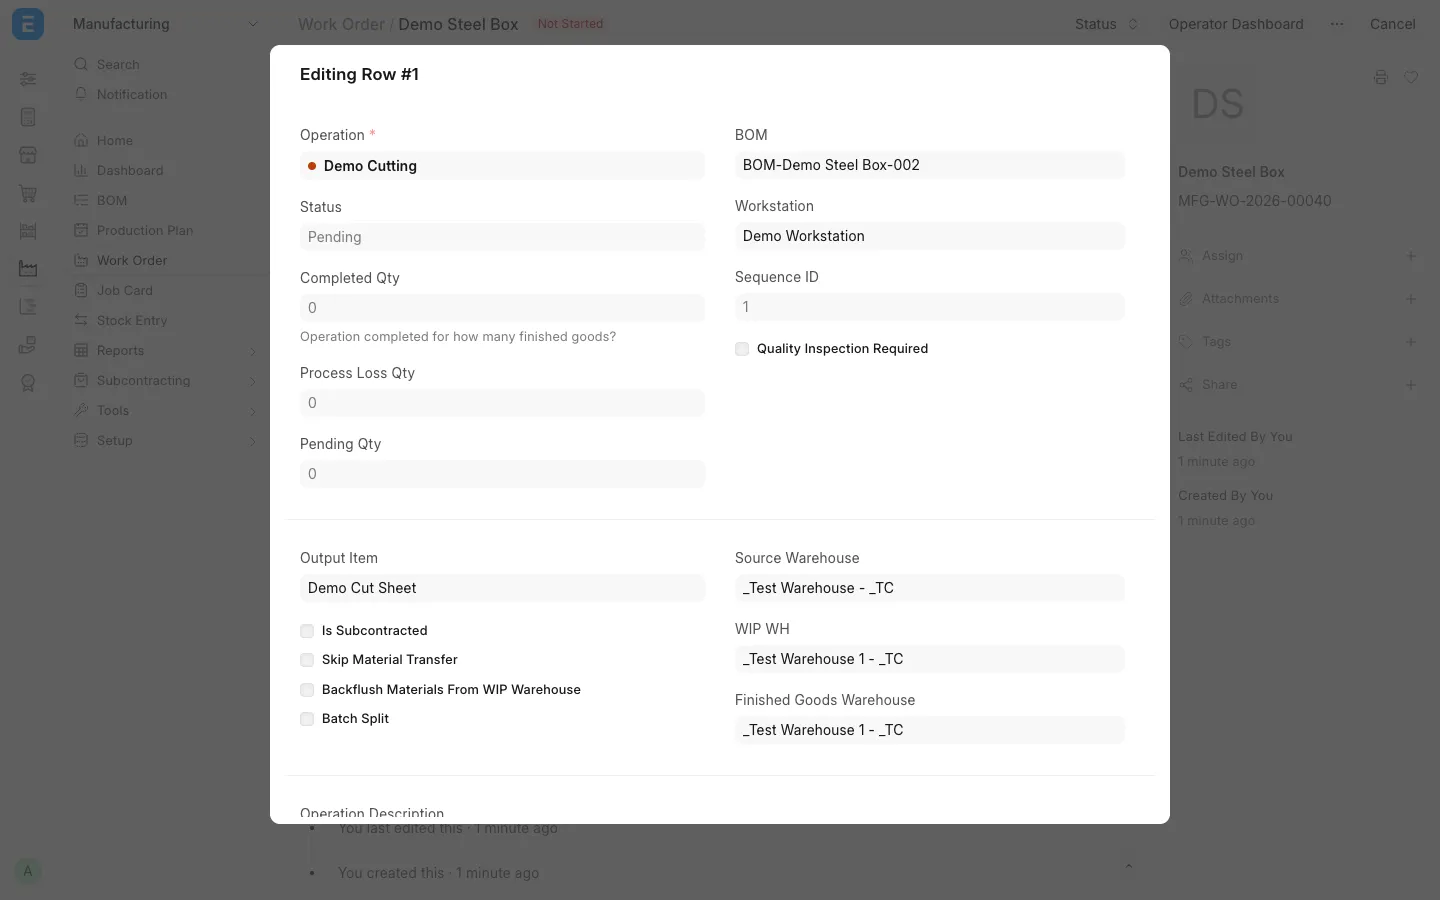
Create a Work Order for the BOM's item as usual, for example for 5 Demo Steel Box. On the Operations tab, every step shows its Output Item and Output Item BOM.
When you submit the Work Order, ERPNext makes one Job Card for every step. You can work on them from the Job Card form or from the Workstation Dashboard. The Work Order is completed when the output of the Last Step is recorded.
Where each step takes its raw materials from
This depends on two checkboxes of the step:
| Skip Material Transfer to WIP | Backflush Materials From WIP Warehouse | Raw materials are consumed from | Move materials first? |
|---|---|---|---|
| Not ticked | Not used | WIP Warehouse | Yes, with Move Materials on the Job Card |
| Ticked | Ticked | WIP Warehouse | No |
| Ticked | Not ticked | Source Warehouse | No |
In every case, the Output Item of the step goes to the Target Warehouse of its Job Card.
Step 3: Work through each Job Card
Open the Job Card of the first step, Demo Cutting. The step guide at the top shows where you are:
1. Move Materials › 2. Start Job › 3. Complete Job › 4. Submit
The current step is shown in blue, finished steps get a tick, and the button for the current step sits next to the timer. Submit stays hidden until the work is done, so the Job Card cannot be submitted by mistake.
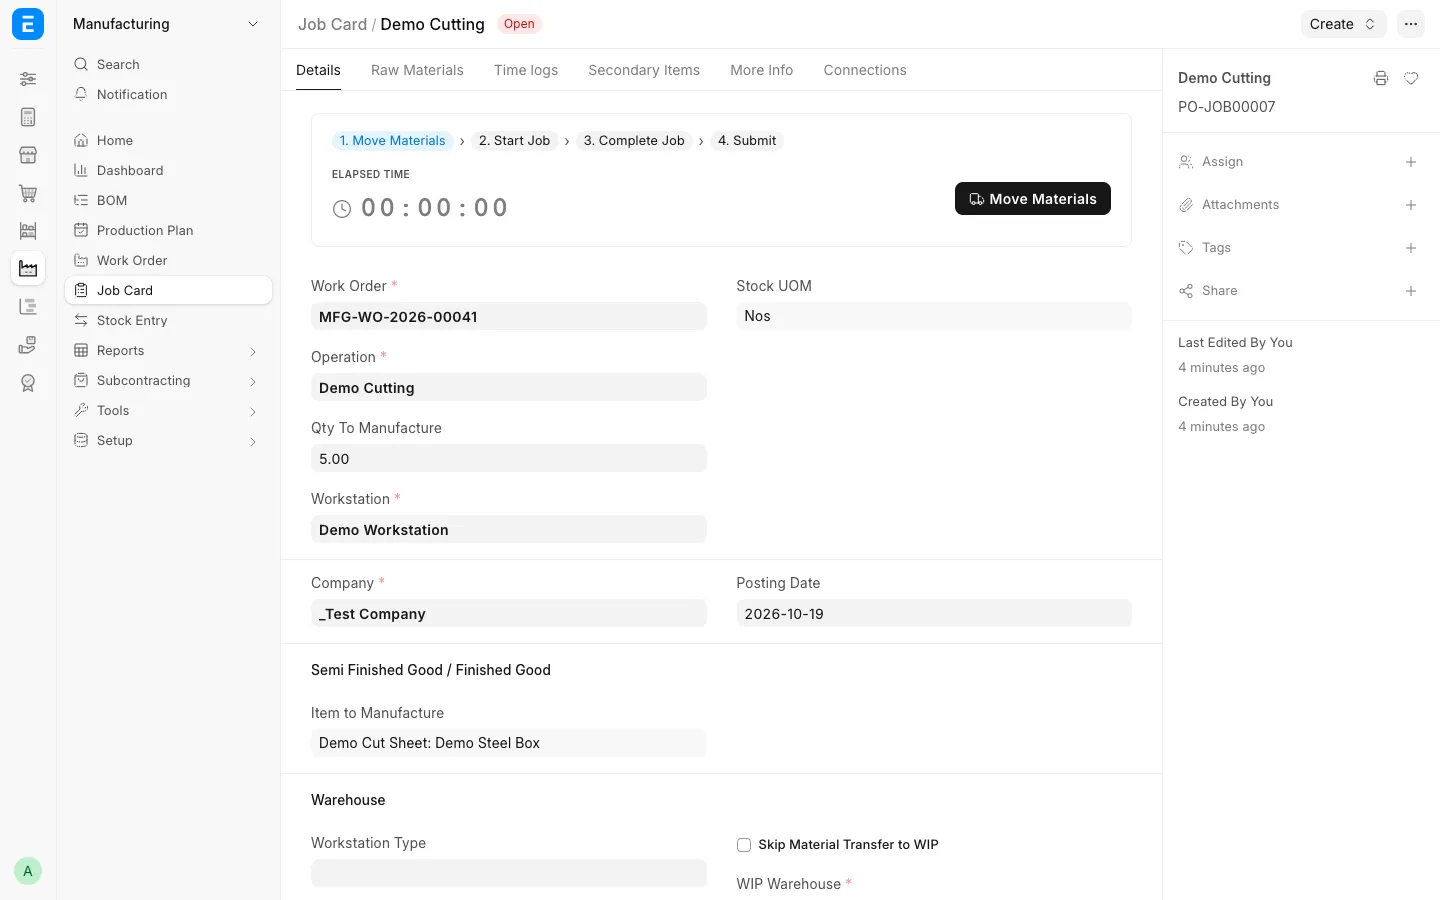
- Move Materials. Click Move Materials. When the source warehouse has enough stock, a Material Transfer for Manufacture opens with 10 Demo Steel Sheet. Submit it. This step is not shown when Skip Material Transfer to WIP is ticked.
- Start Job. Click Start Job when the work begins, and select the employee if asked.
- Complete Job. Click Complete Job and enter the quantity made, for example 5.
- Submit. The first three steps are now ticked and Submit appears. Submit the Job Card.
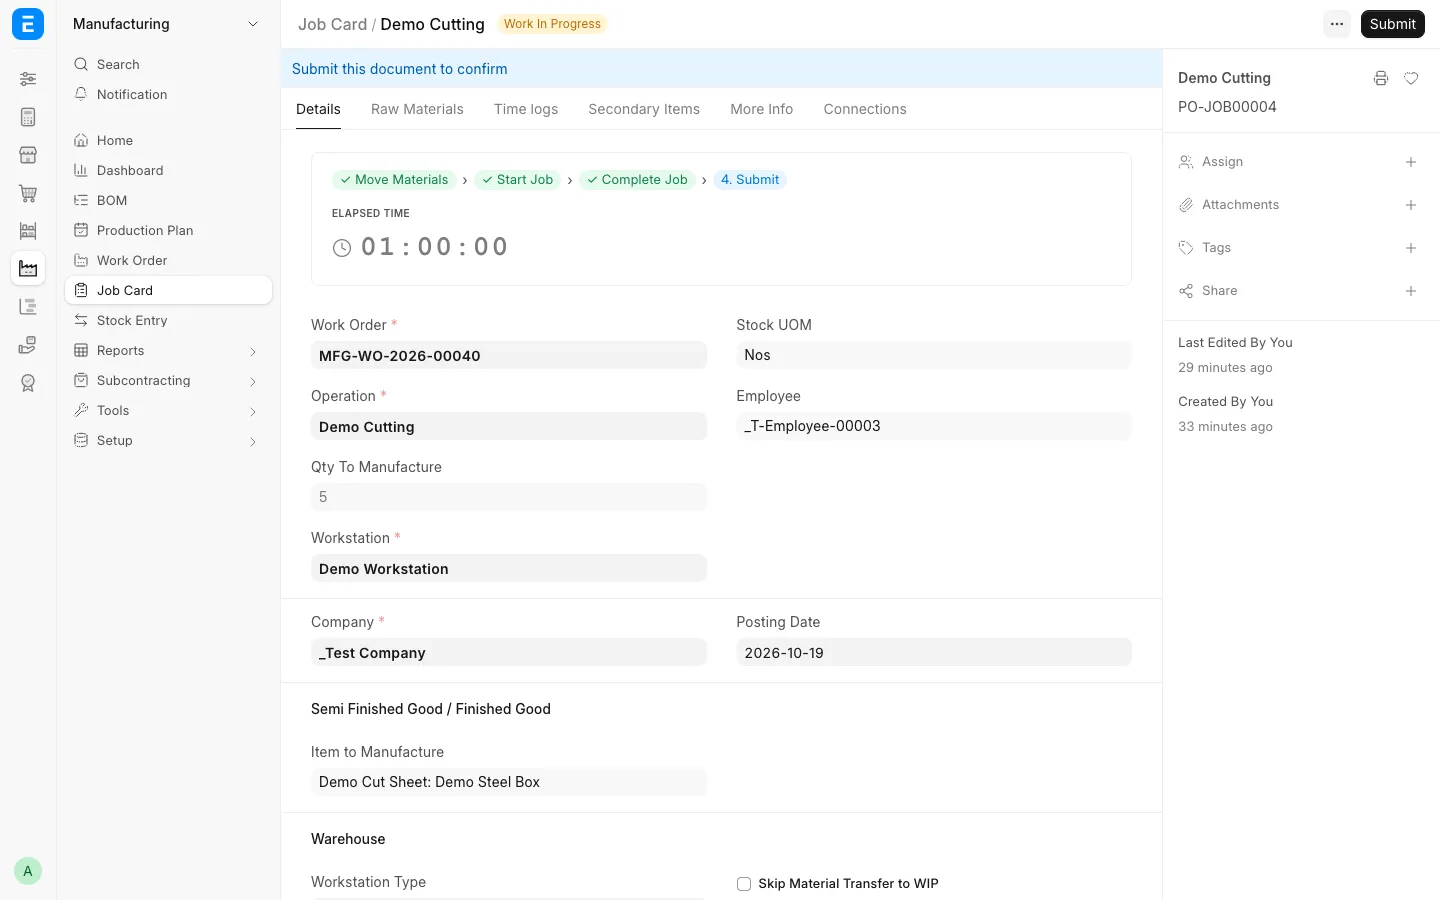
You can also fill the Time Logs table yourself instead of using the timer. To Time is needed only when Enforce Time Logs is ticked in Manufacturing Settings.
When stock is short
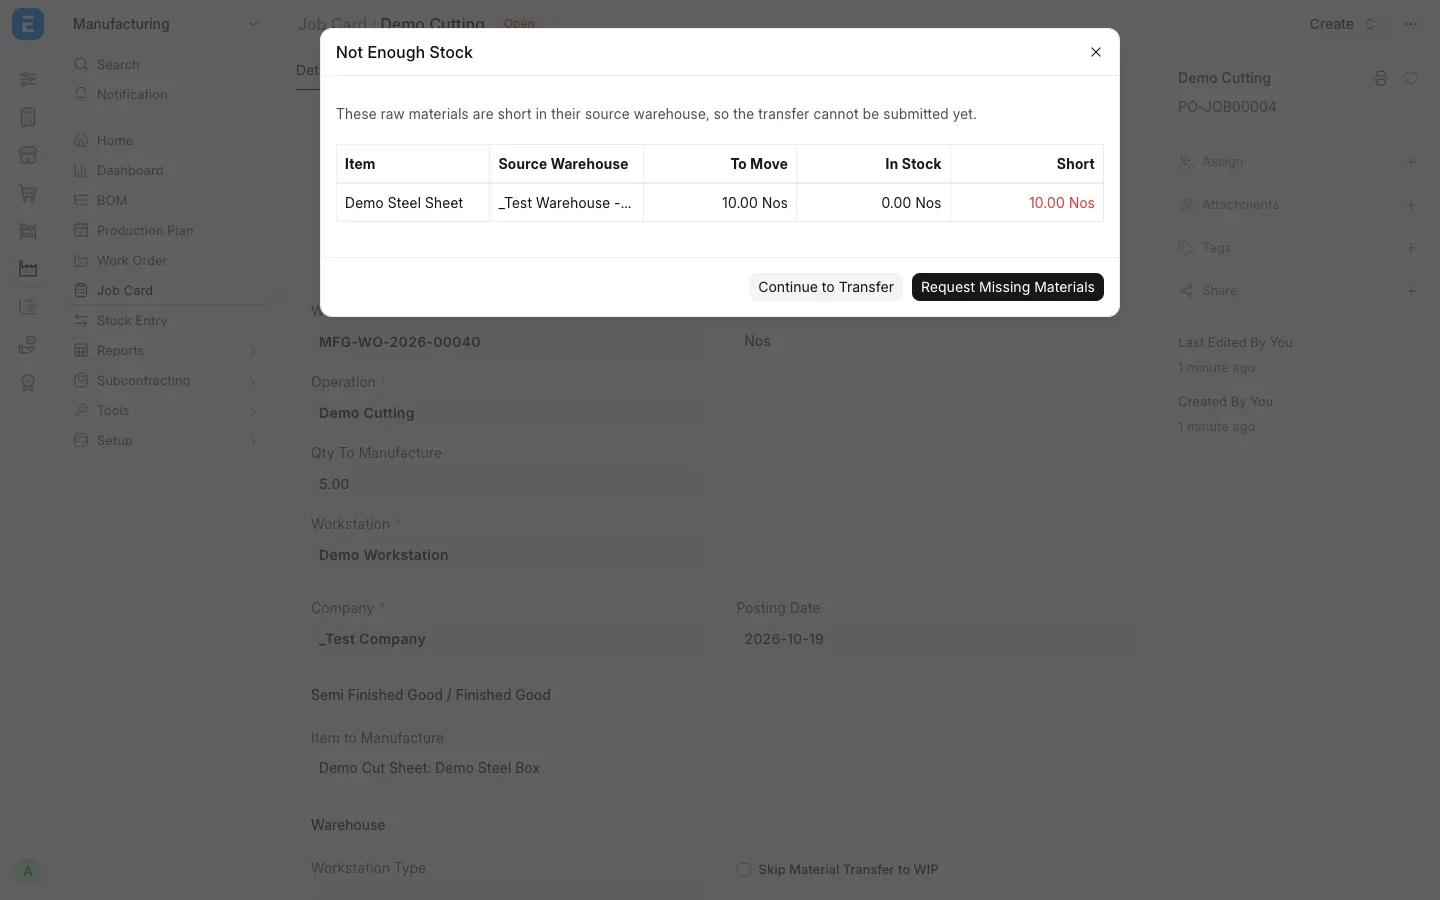
If the source warehouse does not have all the raw materials, Move Materials shows Not Enough Stock, with To Move, In Stock and Short for each raw material:
- Request Missing Materials makes a Material Request for only the quantity that is short, linked to the Job Card.
- Continue to Transfer opens the transfer for the full quantity anyway, for example when the stock is about to arrive.
If the Job Card cannot be submitted
| Message | What to do |
|---|---|
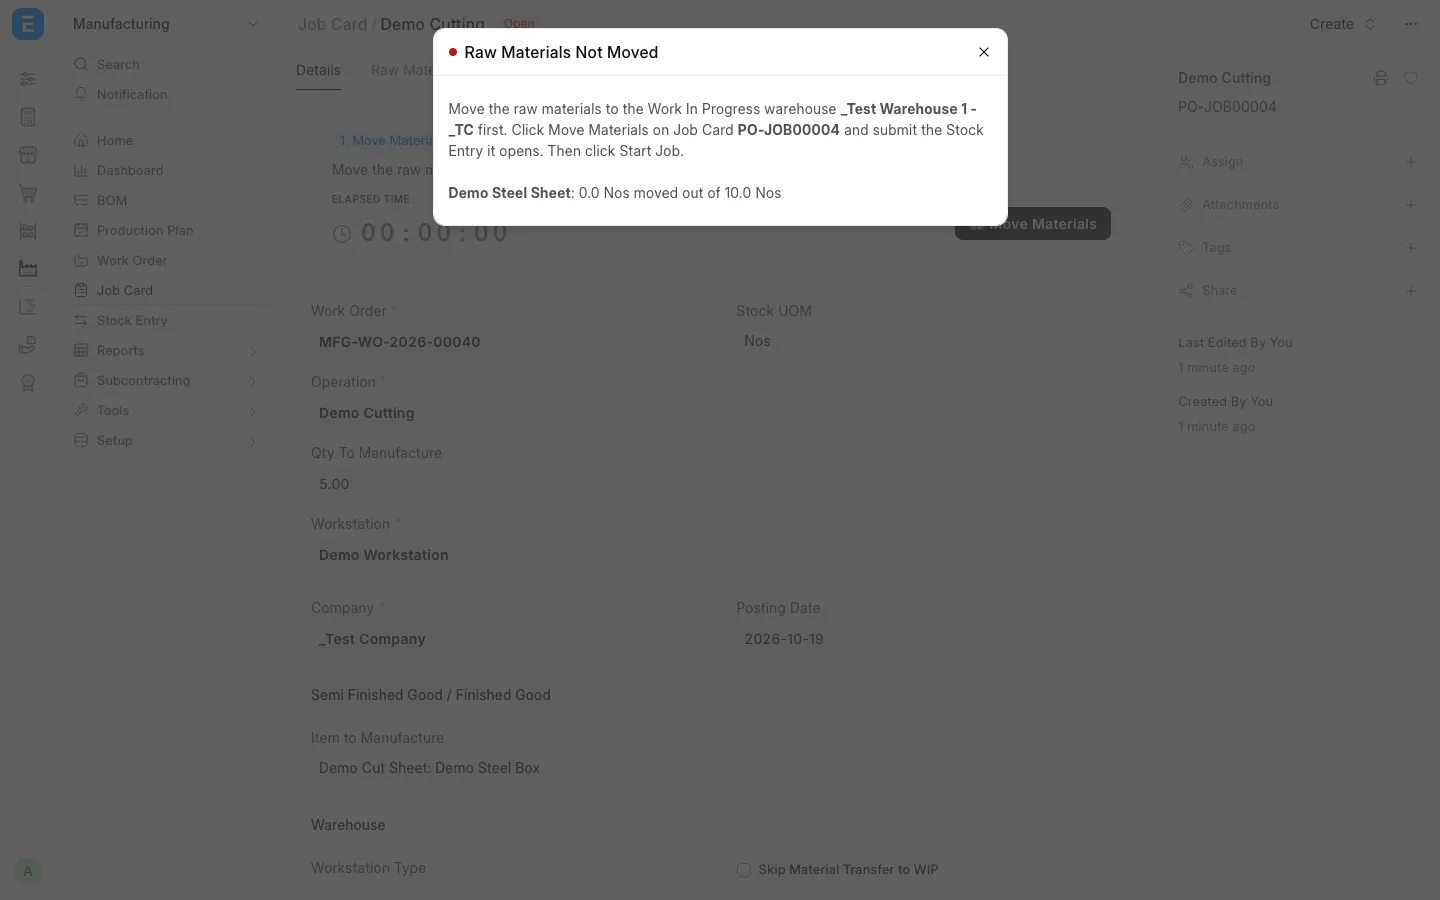
| Raw Materials Not Moved: Move the raw materials to the Work In Progress warehouse first. The message also lists each raw material still to move. | Click Move Materials, submit the transfer, then click Start Job |
| Job Not Done Yet: the Job Card has no completed quantity yet. | Click Start Job, then Complete Job, and enter the quantity made |
Step 4: Record the output
After the Job Card is submitted, click Record Output at the top right. A dialog says what will happen, for example "This makes a Stock Entry that puts Demo Cut Sheet made in this Job Card into" followed by the Target Warehouse of the Job Card, and gives these choices:
- Save and Submit: the Stock Entry is submitted. The raw materials of the step are consumed and its Output Item is in stock.
- Save as Draft: the Stock Entry is saved as a draft, so you can check it and submit it yourself.
- Close the dialog to do nothing.
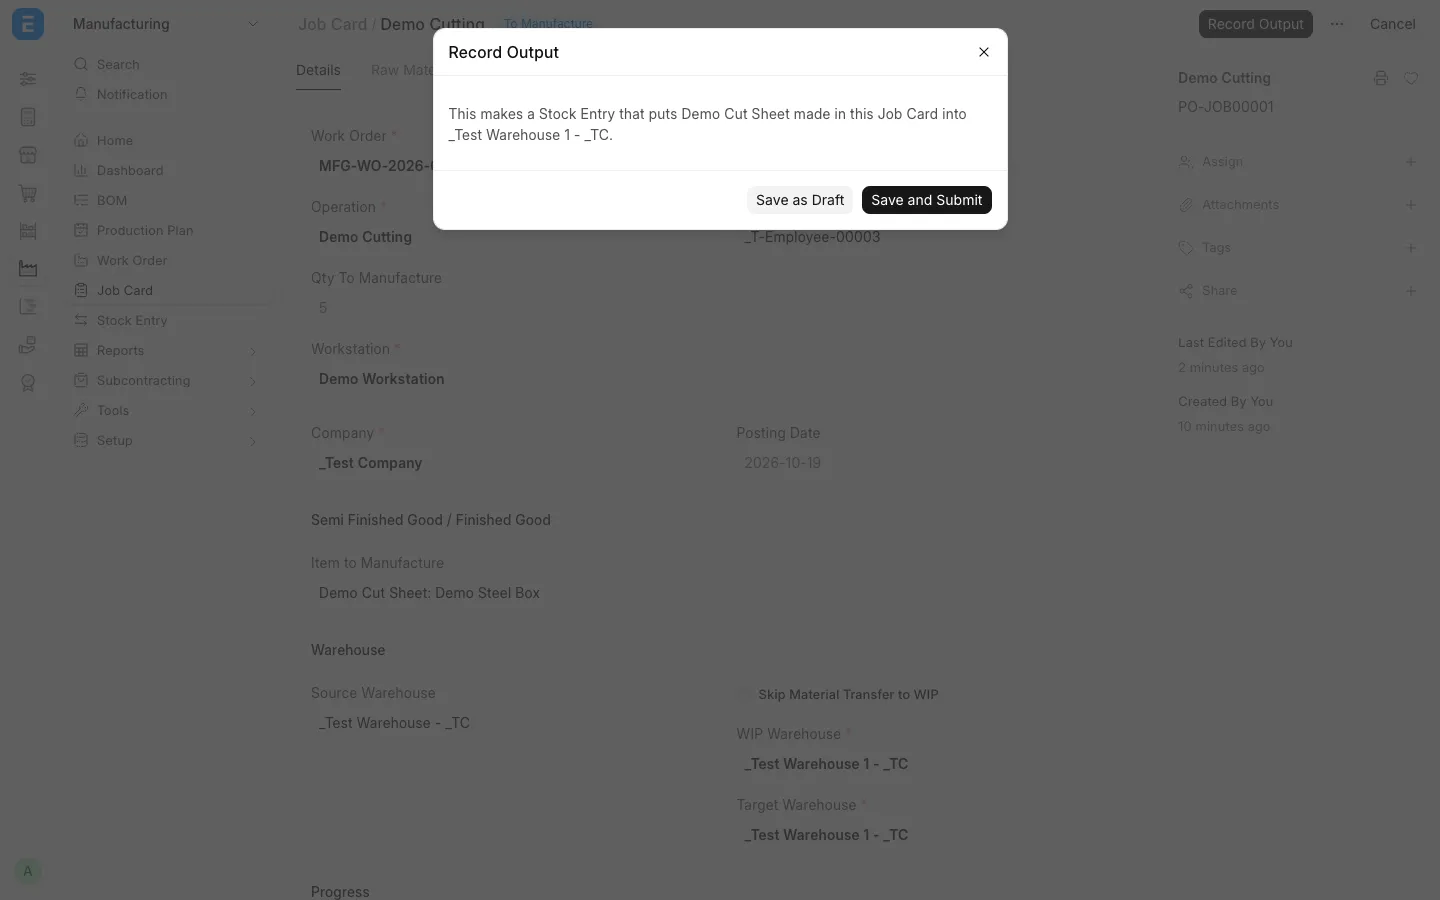
Earlier, this button was called Make Stock Entry and asked a Yes or No question, where No still made a draft Stock Entry.
Now open the Job Card of the next step, Demo Painting, and follow Step 3 and Step 4 again. Its raw materials include the 5 Demo Cut Sheet that Demo Cutting just made. When the output of Demo Painting is recorded, 5 Demo Steel Box are in stock and the Work Order is completed.