Item is term used by Frappe Books for anything that is purchased or sold using a Sales or Purchase Invoice.
Types of Items
An Item is classified by what purpose it's used for.
| # | For | Name | Usage | Navigation |
|---|---|---|---|---|
| 1 | Sales | Sales Items | Sales Invoices | Sales > Sales Items |
| 2 | Purchases | Purchase Items | Purchase Invoices | Purchases > Purchase Items |
| 3 | Both | Common Items | Sales and Purchase Invoices | Common > Common Items |
Usage Make sure that you create the Item under the correct Navigation as this cannot be changed after creation.
Item Fields
When creating a new Item the following fields are displayed:
- Item Image: an image to identify the Item by.
- Item Name: a name to identify the Item by, each Item should have a unique name.
- Item Code: a unique identifier assigned to each Item for easy tracking, reference, and differentiation.
- Item Group: a category or classification under which the Item is grouped for better organization and reporting.
- Purpose: specifies whether the Item is meant for Sales, Purchases, or Both.
- Type: indicates whether the Item is a Product or a Service.
- Unit Type: base unit of the Item to which the rate is applied
- Rate: base cost of an Item, this can be changed in the invoice.
- Description: textual description of what the Item is.
- Sales Acc.: the income account that is credited when the Item is sold.
- Purchase Acc.: the expense account that is debited when the Item is purchased.
- Tax: tax applied on the Item when making an invoice, this can be changed in the invoice.
- HSN/SAC: the HSN/SAC code that is used for classifying Items.
- Barcode: a machine-readable code used to quickly identify and scan the Item in transactions.
- Track Inventory: enables stock level monitoring for the Item to maintain accurate inventory records.
- Has Batch: specifies whether the Item is managed in batches for tracking manufacturing or expiry details.
- UOM Conversions: defines conversion rates between the Item’s base unit and other units of measure.
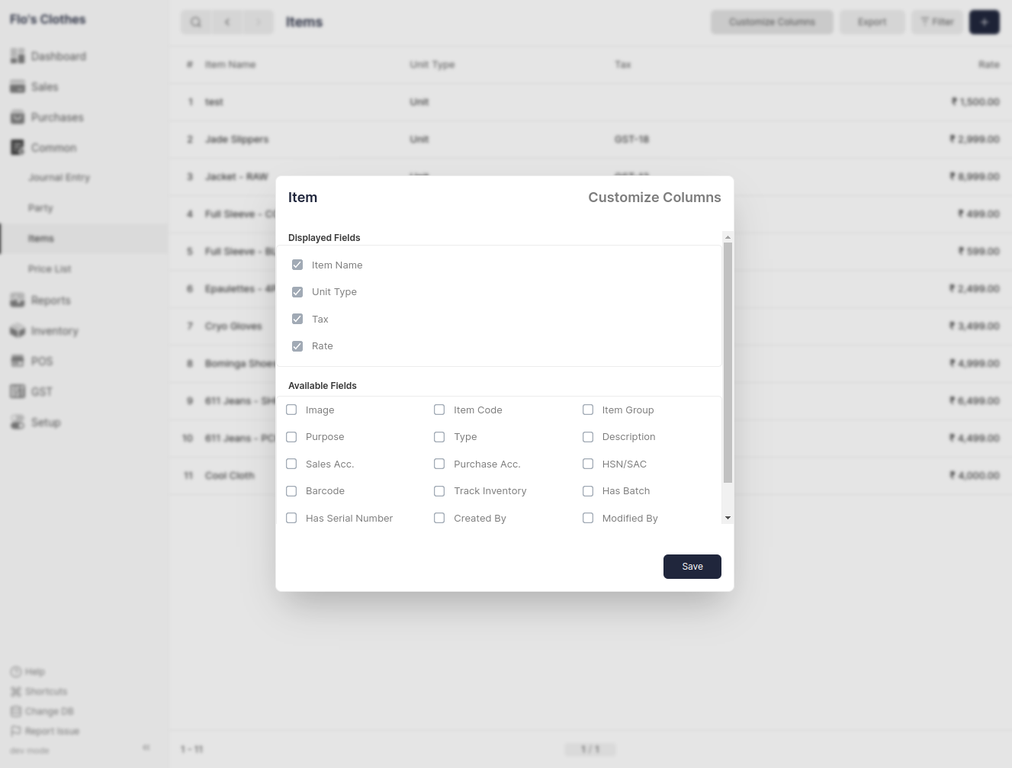
Customize Columns
When the Customize Columns feature is enabled in system settings, a “Customize Columns” button appears in each list view. Clicking this button opens the Column Selector Modal, which allows users to choose which columns are shown in the list. The modal provides a simple and interactive way to personalize data views through checkboxes and drag-and-drop actions.
Inside the modal, users see two sections — Displayed Fields and Available Fields. Displayed Fields show the columns that are currently visible in the list view, while Available Fields contain other fields that can be added. Users can easily reorder displayed columns by dragging them, remove columns by unchecking them or dragging them out, and add new columns by checking or dragging them from the Available Fields section. Required fields are protected from being removed, and hidden or table-type fields are excluded automatically. Once the desired columns are selected and arranged, clicking the Save button applies the changes and updates the list view accordingly.