


















Blocks are the things you put on a print format that are not fields of the document: a heading, a logo, a QR code, a value from the customer record, or a piece of your own HTML. This page explains every block, its settings, and what it prints.
Applies to Frappe v16 and later.
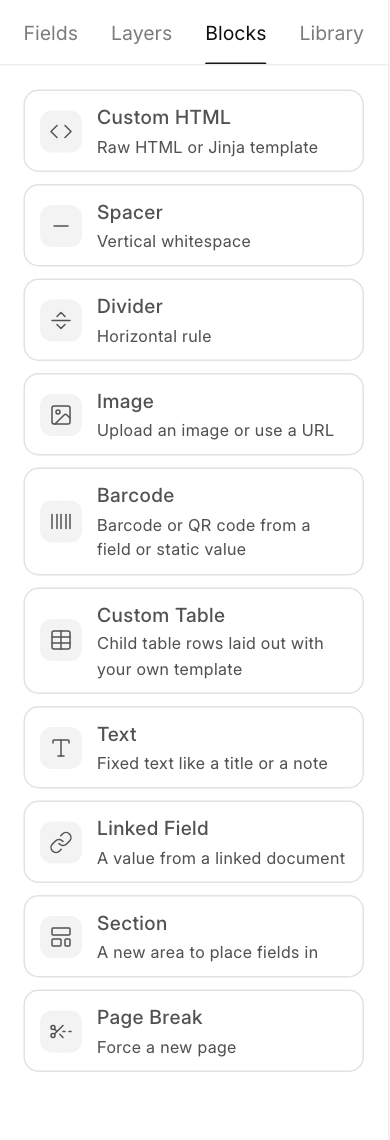
Adding a block
Open the Blocks tab in the left panel. Then either:
- drag the block to where you want it on the page, or
- click it. It is added below the selected field. With nothing selected, it goes into the last section.
Once placed, a block is selected like any field. Its settings appear in the right panel, and every block has Custom CSS and Visibility at the bottom, so you can style it or print it only sometimes.
Which blocks are available
| Block | Use it for |
|---|---|
| Text | Fixed text: a title, a note, a thank you line |
| Image | A logo, a stamp, a signature, any picture |
| Barcode | A barcode or QR code from a field or a fixed value |
| Linked Field | A value from a linked document, such as the customer's tax ID |
| Custom Table | Child table rows laid out with your own template |
| Spacer | Empty vertical space |
| Divider | A thin horizontal line |
| Custom HTML | Your own HTML and Jinja, for anything the other blocks cannot do |
| Typst | Your own Typst markup. Replaces Custom HTML when the PDF renderer is Typst. |
| Section | A new section to place fields in |
| Page Break | Start a new page |
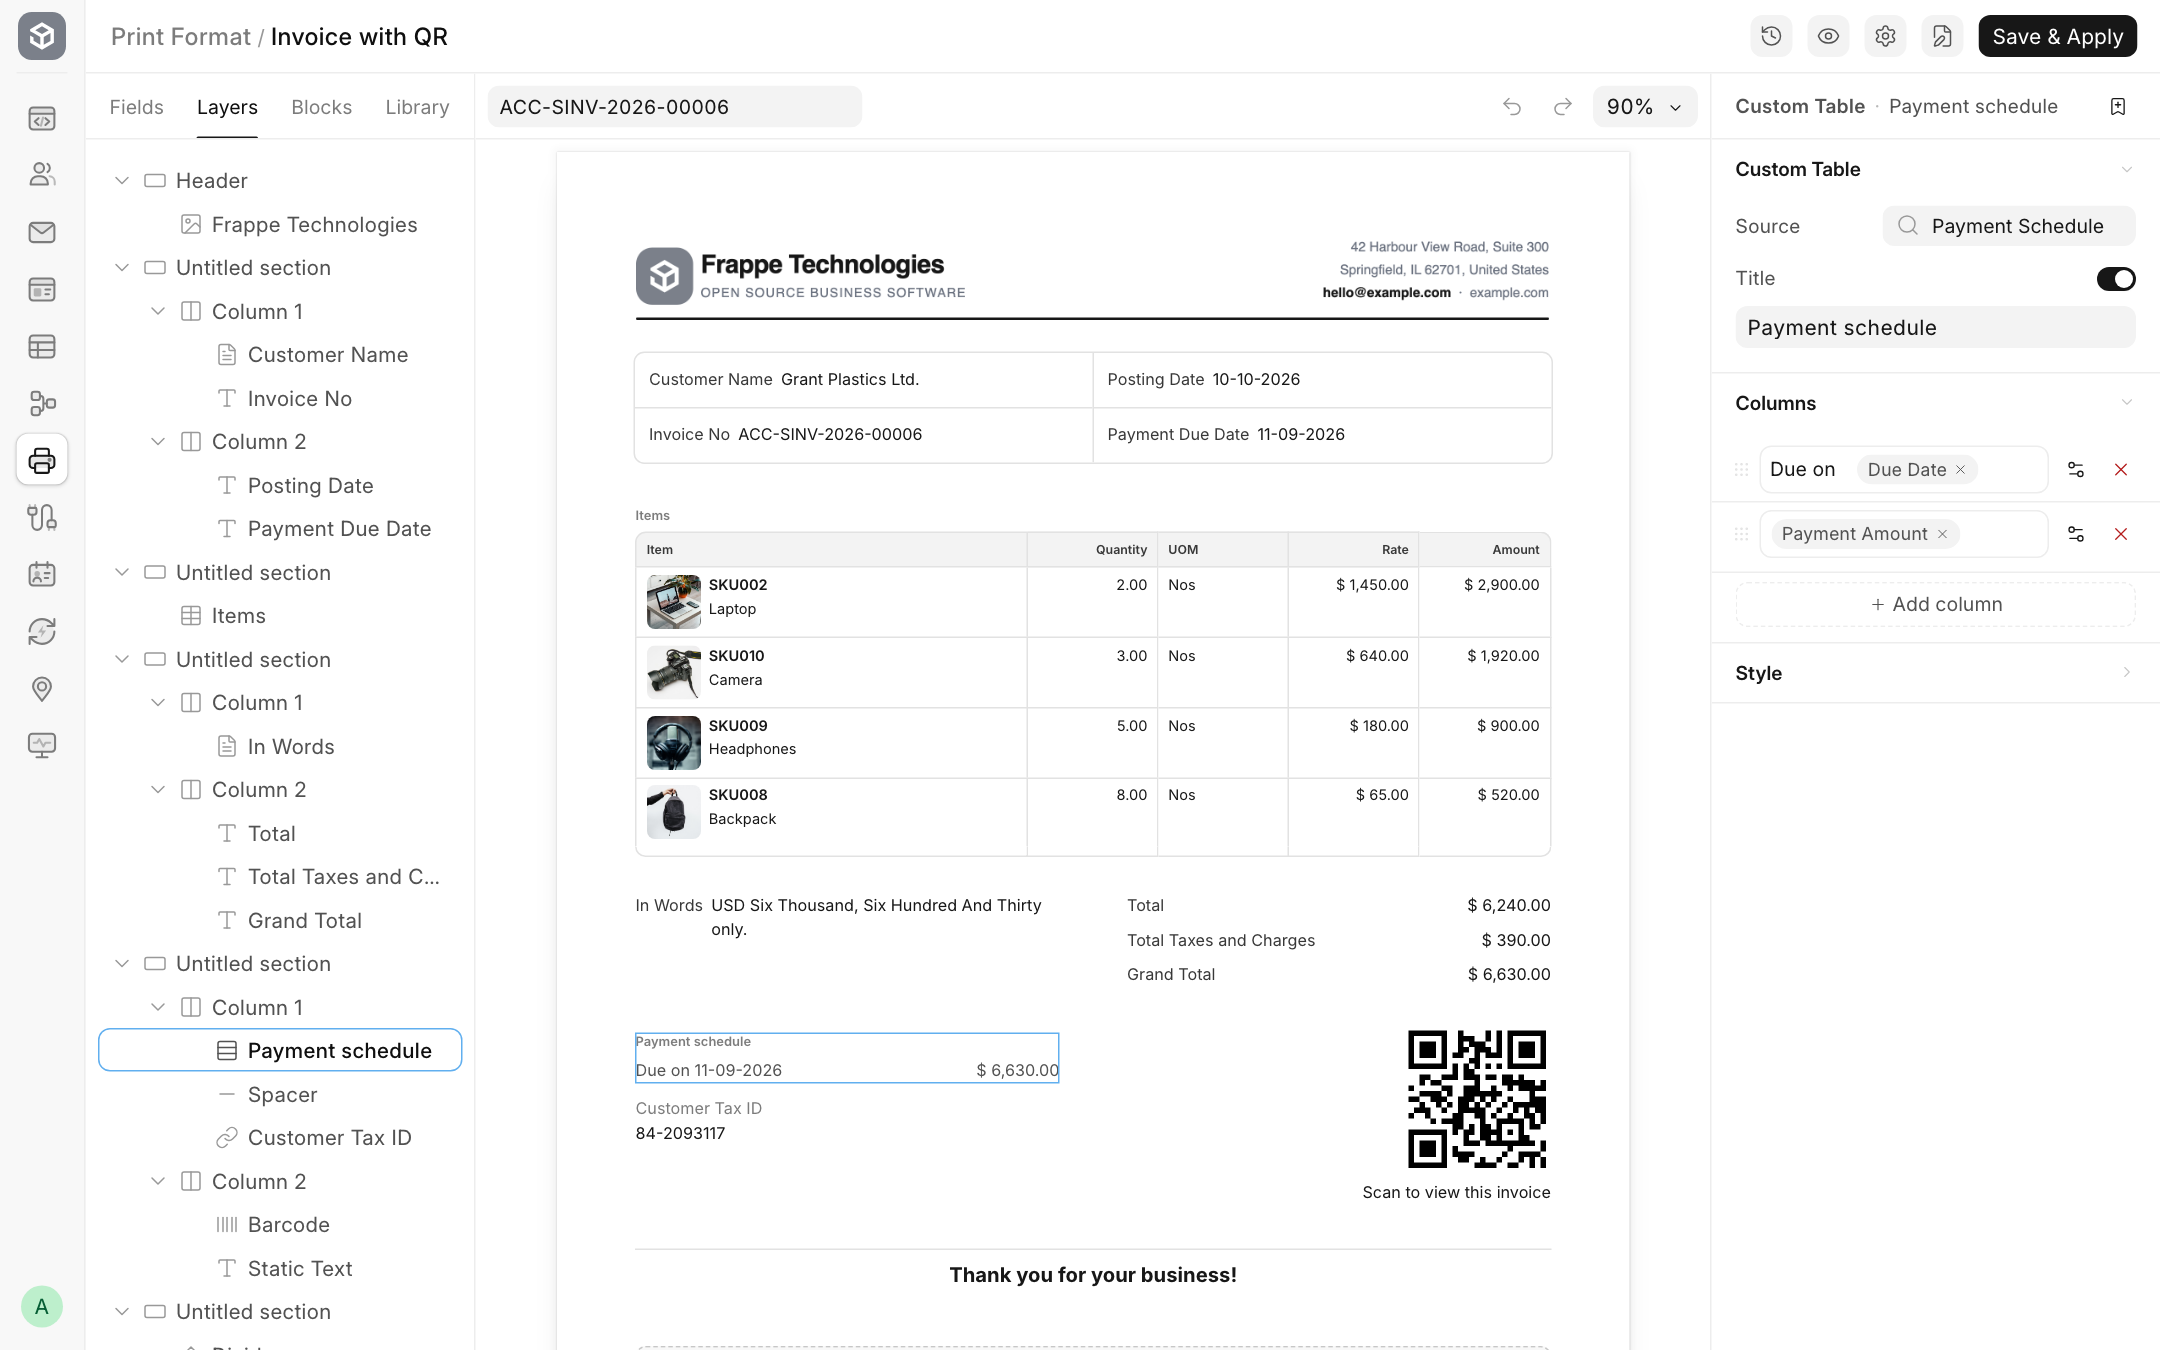
Here is what a few of them look like at the bottom of an invoice: a Custom Table with the payment schedule, a Linked Field with the customer's tax ID, a QR code, a Divider and two Text blocks.
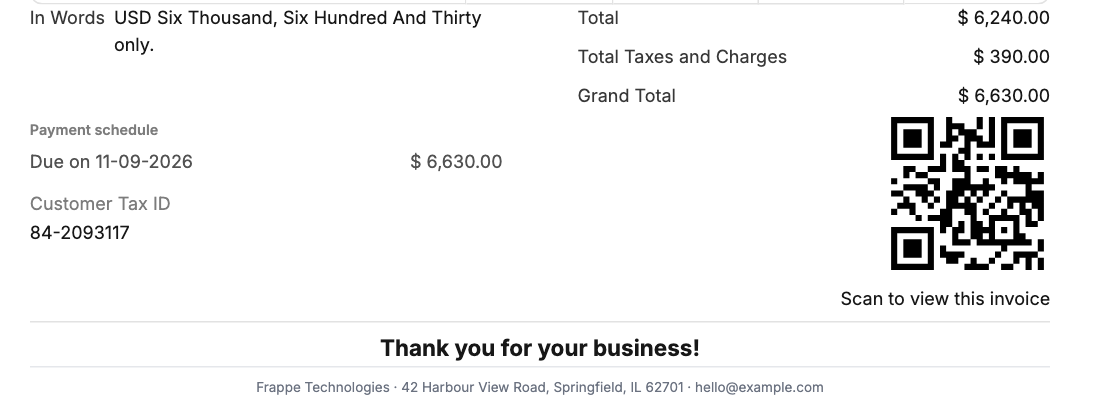
The list depends on the format's PDF renderer. With Chromium (the default) you see Custom HTML. With Typst you see Typst in its place. See Page settings and PDF renderer.
Text
Prints fixed text that does not come from the document, such as "Thank you for your business" or "Goods once sold will not be taken back".
| Setting | What it does |
|---|---|
| Text | The text to print. Press Enter for a new line. |
| Bold | Prints the text in bold. |
| Font size | Size in pixels. Leave empty for the page font size. |
| Align | left, center or right. |
The text is printed as it is. It is translated into the print language when a translation exists, but it cannot contain field values. To print a document value inside a sentence, use a Custom HTML block.
Image
Prints a picture: a logo, a payment QR image, a signature or a stamp.
| Setting | What it does |
|---|---|
| Upload Image | Upload a picture from your computer. It is saved in Home/Attachments. After an upload the button reads Change Image. |
| or image URL | Use a picture from a web address instead of uploading. |
| Clear | Removes the picture. |
| Size | The width, from 20 to 700 pixels. A new image starts at its own width, up to 300 pixels. |
| Align | left, center or right. |
The image is the same on every printout. To print an image that changes with the document, such as the item image, add the document's image field from the Fields tab, or use a Linked Field pointing at an image field.
Note: the Typst renderer cannot load images from a web address. Upload the image instead if you use Typst.
Barcode
Prints a barcode or a QR code, for example the invoice number as a barcode, or a payment link as a QR code.
| Setting | Options | What it does |
|---|---|---|
| Value from | Static value, ID (name), or any field of the document | Where the barcode's value comes from. ID (name) uses the document's number, for example ACC-SINV-2026-00006. |
| Value | text | The fixed value to encode. Only shown when Value from is Static value. |
| Format | CODE128, CODE39, QR | CODE128 is the usual choice for numbers and letters. CODE39 is for older scanners. QR makes a square QR code. |
| Size | 40 to 500 pixels | The width of the code. |
| Value text | on, off | Prints the value in plain text under the barcode. Not shown for QR codes. |
| Align | left, center, right |
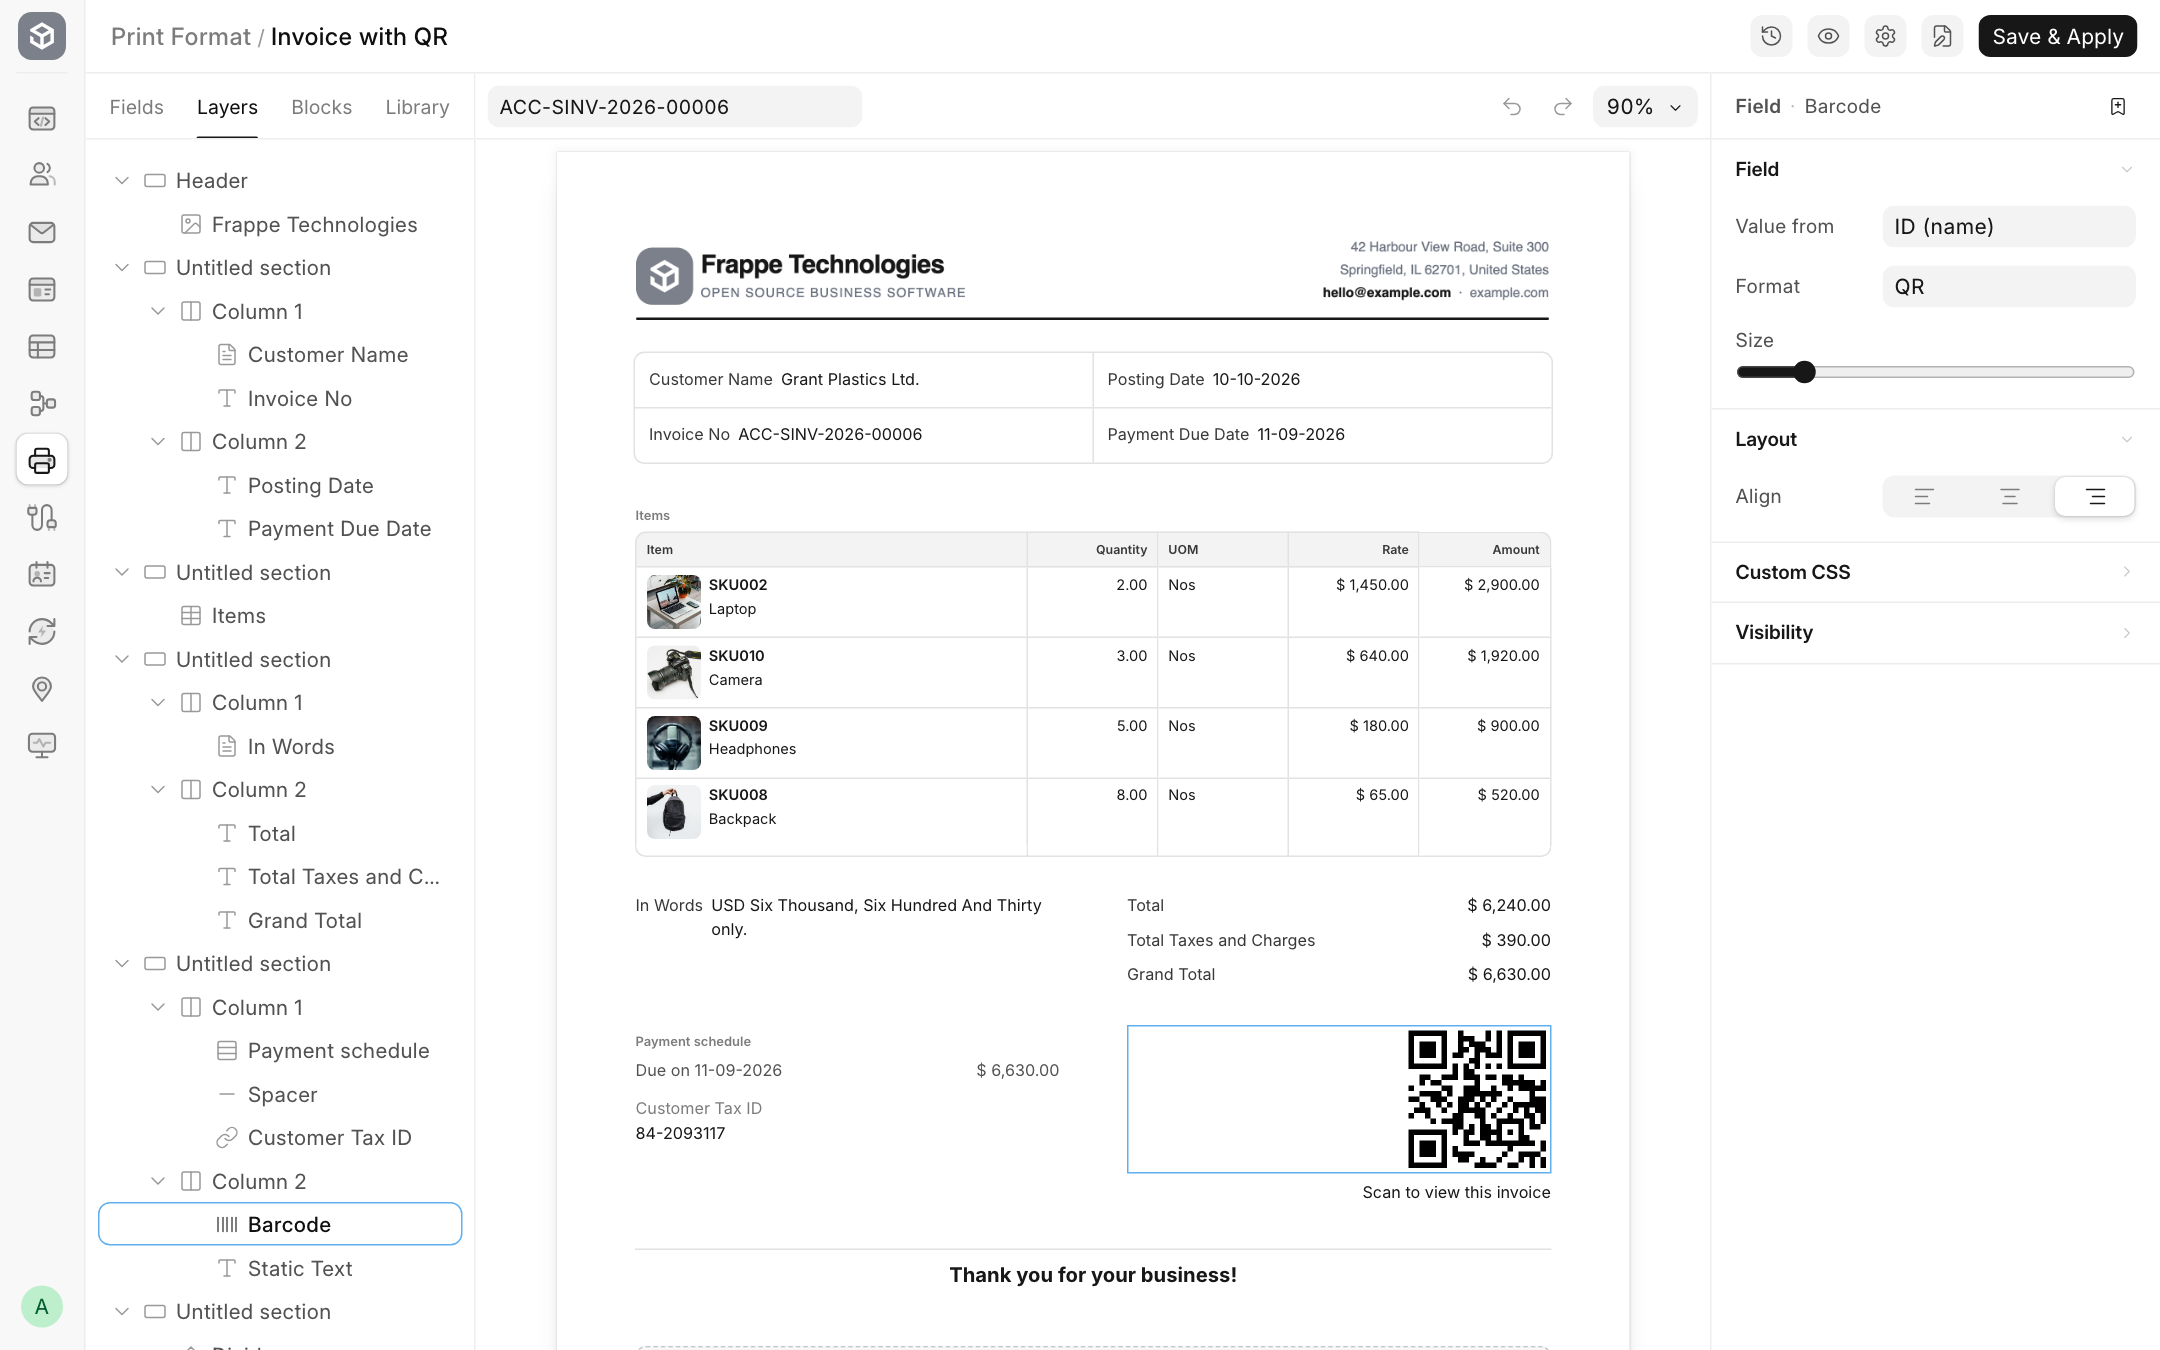
A QR code can hold up to 2000 characters, so a full web address fits.
If the document already has a Barcode field, you can drag that field in from the Fields tab instead. Its format comes from the field's own settings, and only Size can be changed.
Note: the Typst renderer prints QR codes only. Use Chromium for CODE128 or CODE39 barcodes.
Linked Field
Prints a value from a document that this document links to. For example, a Sales Invoice links to a Customer, so you can print the customer's tax ID or territory without adding a field to the invoice.
| Setting | What it does |
|---|---|
| Link | The link field to follow, shown with the document type it points to, for example Customer (Customer). |
| Field | The field to print from the linked document, for example Tax Id. The block's label is set to this field's label. |
| Label and Show label | The label printed next to the value. |
| Size | Only when the linked field is an image. The width of the image. |
It also has the usual Bold, Font size, colour and Align settings, and one setting that plain fields do not have:
| Setting | What it does |
|---|---|
| Print if empty | Prints the label even when the linked value is empty. Turn it on for forms where the space must always be there, such as "Vehicle No." on a delivery note. |
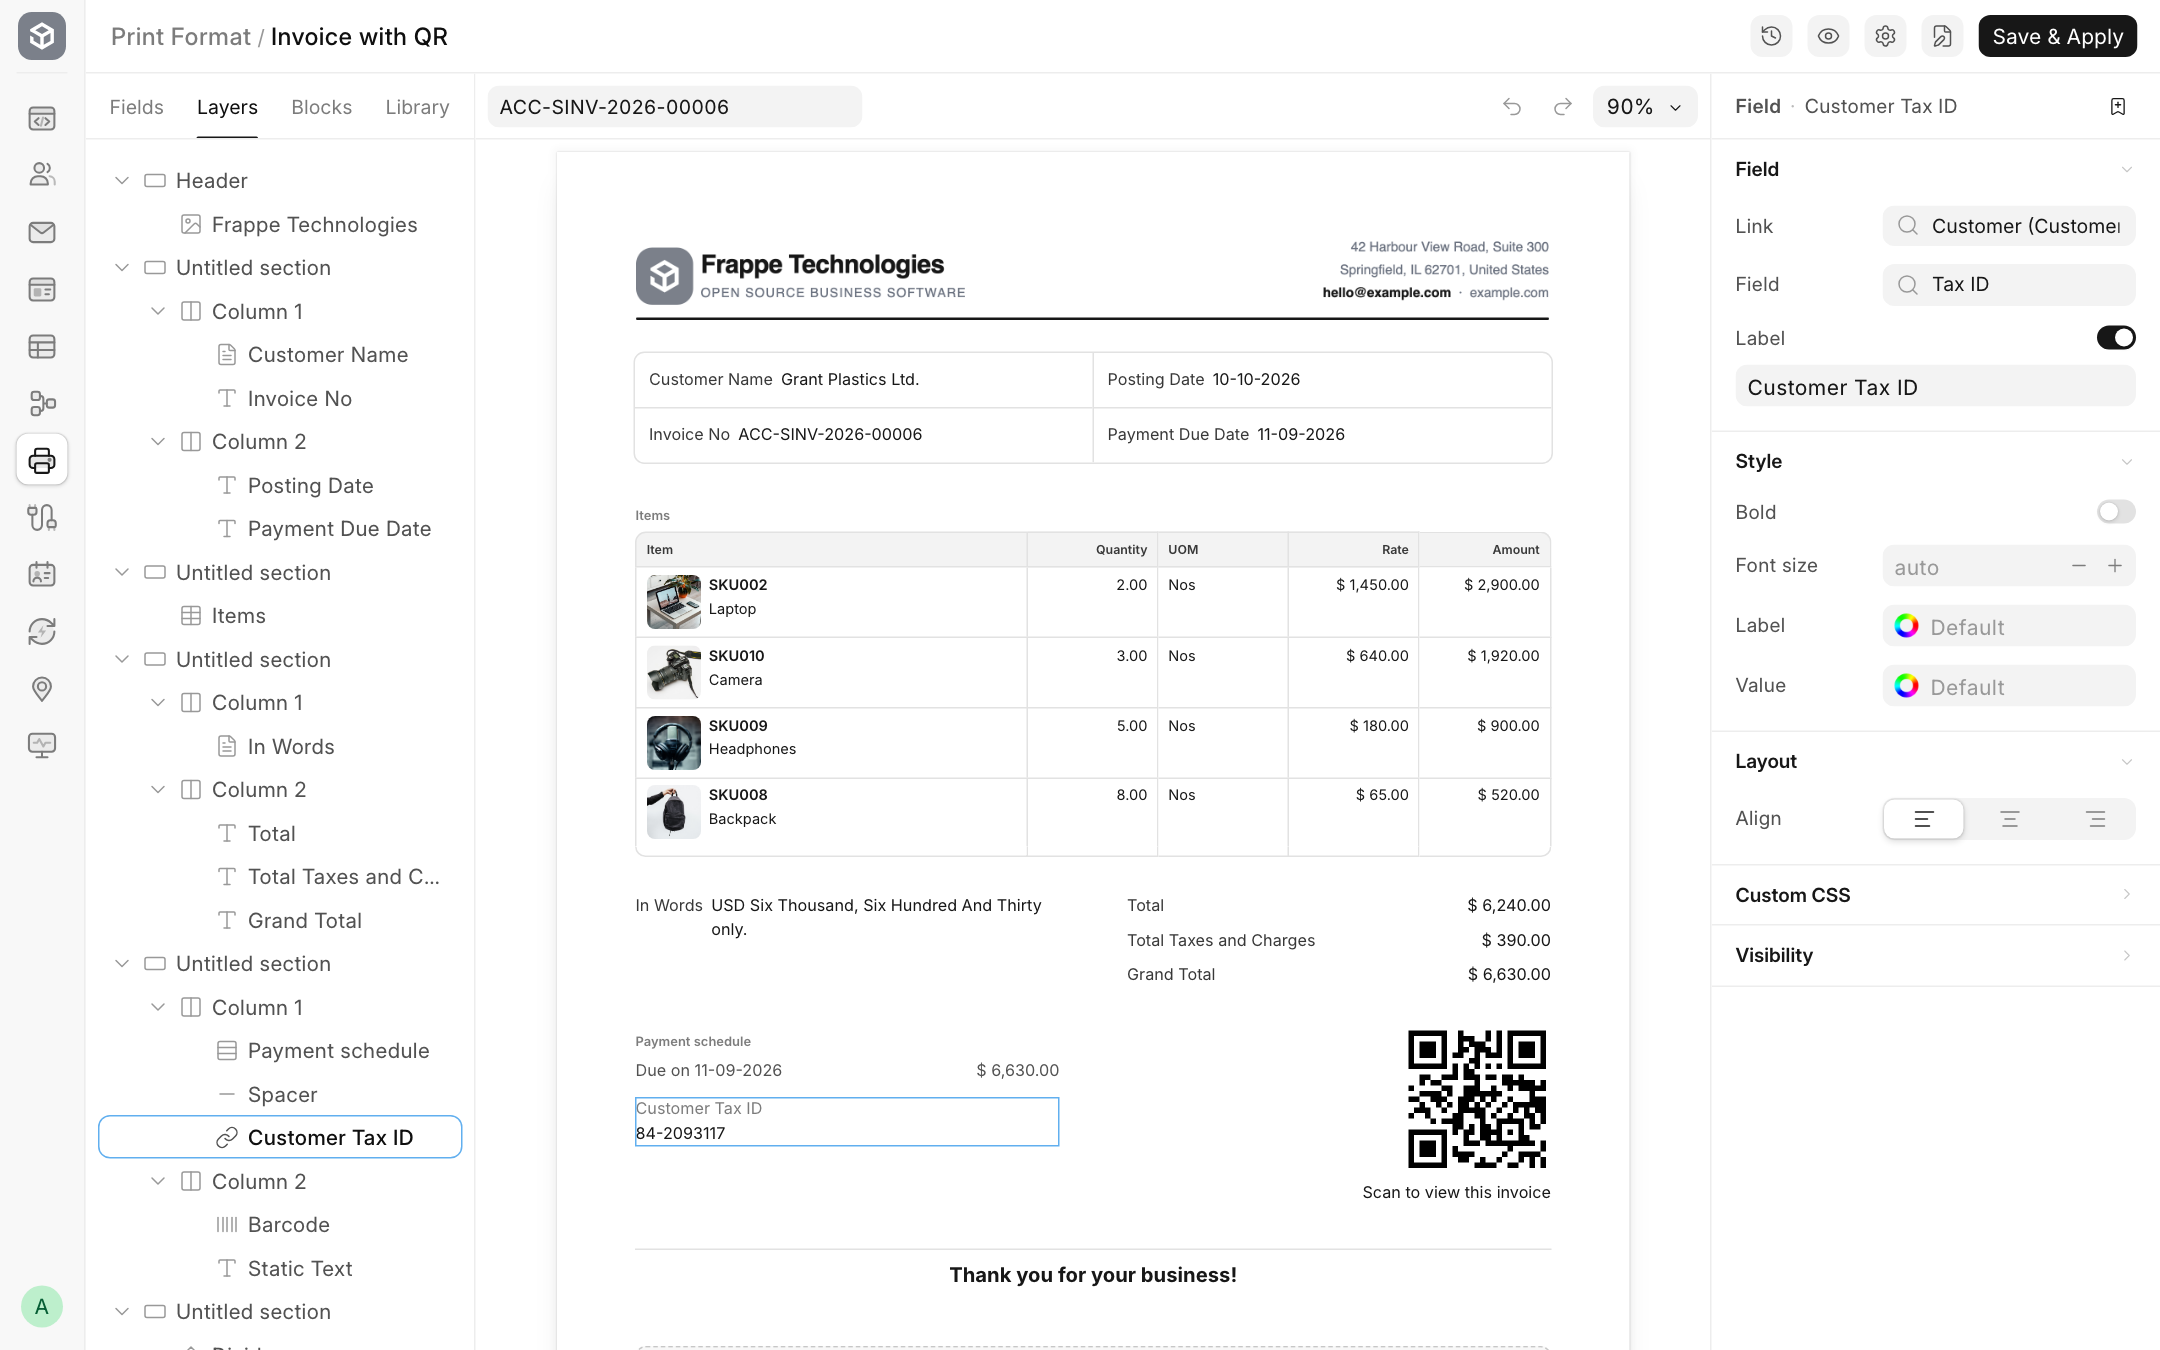
Linked Field follows one link only. The person printing must be allowed to read the linked document, otherwise the value is left out.
Custom Table
Prints the rows of a child table with your own layout instead of a grid. Use it when a normal table is too heavy, for example a compact list of payment terms, or a list of serial numbers.
Settings
| Setting | What it does |
|---|---|
| Source | The child table to print, for example Payment Schedule. |
| Title and Show title | An optional heading above the rows. |
| Columns | Each row prints as these columns. Every column has a template. Click Add column to add one. |
Click the settings button next to a column to set its Width (percent), Align and Colour.
Writing a column template
A template mixes your own text with fields of the row:
- Click in the column's template box.
- Type plain text, for example
Due on. - Type
/to open the list of the row's fields. Keep typing to filter it, then press Enter to insert the field. It shows as a small badge. - Carry on typing, and add more fields the same way.
For a payment schedule, two columns like these:
| Column | Template |
|---|---|
| 1 | Due on due_date |
| 2 | payment_amount |
print one line per row:
Due on 09-11-2026                    $ 3,315.00
Due on 09-12-2026                    $ 3,315.00
Use Backspace to delete the badge before the cursor. Fields print formatted, so dates, currency and numbers look the same as everywhere else.
When the source table has no rows, nothing is printed.
Spacer
Adds empty vertical space between two things.
| Setting | What it does |
|---|---|
| Height | The space in pixels. A new spacer is 10 pixels. |
Divider
Draws a thin grey line across the column. It has no settings of its own. Use Custom CSS to change it, for example border-bottom: 2px solid #111827;.
Custom HTML
Prints your own HTML. Use it for anything the other blocks cannot do: a sentence that mixes several values, a signature box, a terms block with special formatting.
Select the block and click Edit HTML. The editor opens with your HTML on the left and a live preview on the right, using the document you picked for the preview.
You can use Jinja to print values. The document is available as doc:
<p>
  Thank you, {{ doc.customer_name }}, for your order
  {{ doc.po_no or "" }}.
</p>
<p>Amount due: <b>{{ doc.get_formatted("grand_total") }}</b></p>
Child table rows are available as lists:
<ul>
{% for row in doc.items %}
  <li>{{ row.item_name }}: {{ row.get_formatted("amount") }}</li>
{% endfor %}
</ul>
Things to know:
- Use
doc.get_formatted("fieldname")to print a value the way the form shows it, with currency symbols and date formats. frappeutilities that are safe for templates are available, for examplefrappe.format_date(doc.posting_date)andfrappe.db.get_value("Customer", doc.customer, "tax_id"). See Jinja API.- For safety, scripts, styles, forms, iframes and event handlers such as
onclickare removed when you save. Put styles in the block's Custom CSS or the page's Custom CSS instead. - A section that contains a Custom HTML block always prints, even if the block prints nothing.
Note: a format with a Custom HTML block cannot use the Typst renderer.
Typst
Only shown when the format's PDF renderer is Typst. It takes the place of Custom HTML and prints your own Typst markup.
Type the markup in the block's text box, or click Edit Typst on the page. Use {{ doc.fieldname }} for values from the document:
#text(weight: "bold", size: 14pt)[Thank you, {{ doc.customer_name }}]

Amount due: *{{ doc.get_formatted("grand_total") }}*
Things to know:
- Values are escaped for Typst, so a customer name with
#or*prints as it is. To insert raw Typst markup from a value, write{{ value | typst_raw }}. - Jinja tags such as
{% for row in doc.items %}work too. - The editor page shows a placeholder for this block. Click Show Preview to see the result in the PDF.
- When you save, the markup is checked against a real document. If it has an error, the save stops and tells you what is wrong.
- A format with a Typst block can only use the Typst renderer. To go back to Chromium, remove the block first.
Section and Page Break
These two are at the end of the Blocks tab:
- Section adds a new section below the selected one. See Sections, columns and the page.
- Page Break adds a page break. Everything after it starts on a new page. Click Remove page break on the page to take it out.
Save blocks for reuse
Set up a block once and reuse it in other formats: select it and click the bookmark button at the top of the right panel, or right-click it and choose Save as snippet. It then appears in the Library tab. See Versions, snippets and shortcuts.