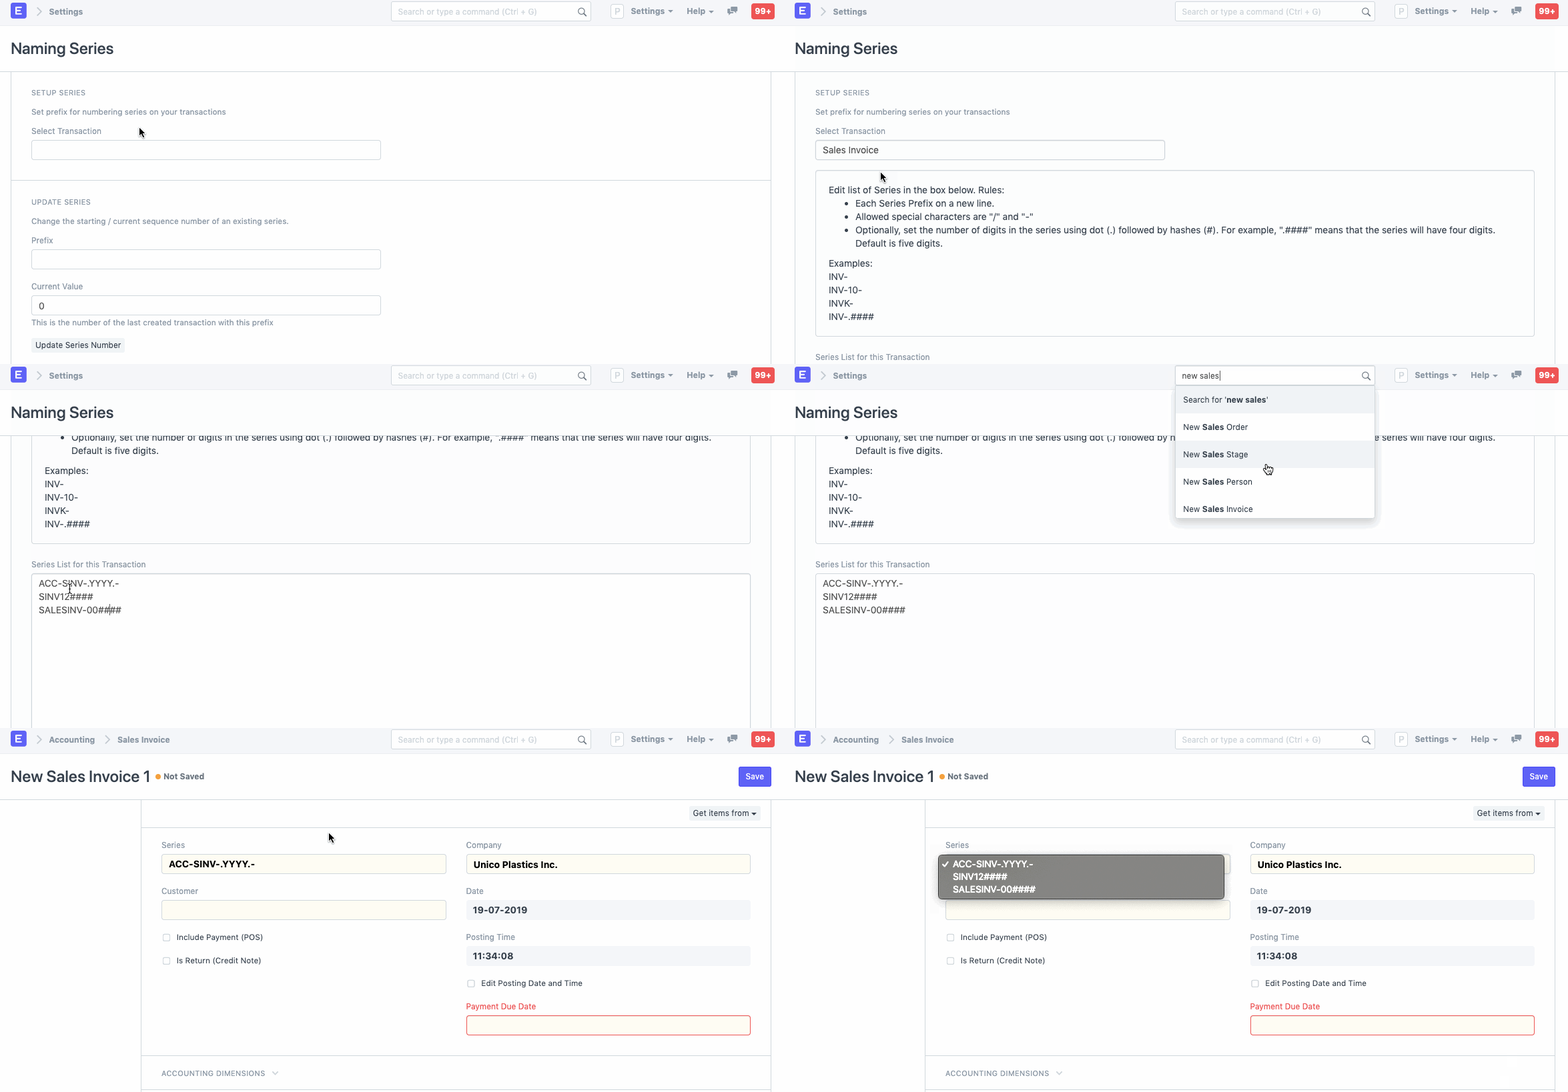
Masters and transactions can be given prefixes in the form of naming series.
ERPNext allows you to make prefixes to your documents, with each prefix forming its own series. For example, a series with prefix INV12#### will have numbers INV120001, INV120002, and so on.
You can have multiple series for all your transactions. For example, Sales Invoice IDs like these can be generated:
- ACC-SINV-.YYYY.-
- SINV12####
- SALESINV-00####
You can define or select the Naming Series pattern from:
Home > Settings > Naming Series
1. Setting up Naming Series for Documents
Select the transaction for which you want to make the series. The system will update the current series in the text box.
Edit the series as required with unique prefixes for each series. The first prefix will be the default prefix. Each new prefix Naming Series must be added on a new line. The newly added naming series will be available in the document.

If you want the user to explicitly select a series instead of the default one, check the “User must always select” checkbox. There will be no default naming series if this is ticked.
You can also update the starting point of a series by entering the series name and the starting point in the “Update Series” section.
Click on the Update button to update the set of Naming Series for the selected document.
Note: To see the newly added Naming Series, click on Settings > Reload.
2. Financial Year in Naming Series
You can also show the financial year in the Naming Series. By default, if you enter 'YYYY' in the naming series, it'll pick up the current year. To set naming series based on the fiscal year, enter something like 'ACC-SINV-.FY.-' where 'FY' will be resolved to match the current Fiscal Year. It is common to have a separate series for each financial year.
Alternatively it is also possible to manually embed the fiscal year in the naming series, for example by entering something like 'ACC-SINV-.19-20.-' where 19-20 is the current Fiscal Year.
As you can see, in the following screenshot of a Sales Invoice, the year 2019 is listed:

3. Updating the current value for existing Naming Series
You can change the starting/current sequence number of an existing series.
- Under the Update Series section, select the prefix whose sequence is to be changed.
- The current value will be fetched and displayed.
- Change starting/existing sequence number if needed.
- Click on Update Series Number.
For example, if the current Sales Order series number is at 16, and you want to restart or set it as 50, enter 0 or 50 depending on your case. Any new Sales Order created will start from the new sequence number.
To know more about this, visit this article.
Tip: You could have a separate series for each type of Customer or for each of your retail outlets.
4. Using Field Values in Naming Series
Some companies prefer to make use of "short-codes" for suppliers, i.e. WN for company "Web Notes" that later can be used in naming series for quick identification.
For example:
A custom field "Vendor ID" is created under Document: Supplier. Then under Naming Series, we allow something like PO-.YY.MM.-.vendor_id.-.#### Resulting in "PO-1503-WN-00001"