
In ERPNext, a POS profile allows using the Point of Sale feature to some extent for “Paid” Sales Invoice.
POS includes advanced features to cater to different functionality, such as inventory management, financials, warehousing, etc., all built into the POS software.
If you are in retail operations, you want your Point of Sale to be as quick and efficient as possible. To do this, you can create a POS Profile for a user.
POS Profile is also utilized in
To access the POS Profile list, go to:
Home > Selling > POS > POS Profile
How to create POS Profile
- Go to POS Profile List, click on “Add POS Profile”.
- Select the Company and Warehouse.
- Add Payment Methods.
- Set Currency, Write Off Account, Write Off Cost Center and Write Off Limit.
- Save.
Additional Options when creating a POS Profile

- Customer: If a Customer is set on POS Profile, selecting the POS Profile on the Sales Invoice/POS Invoice will set the same Customer.
Applicable for Users
By default, all Sales Users can access the POS Profiles created in ERPNext. However, if you want only certain Users to access certain POS Profiles, you can add them to the table. Once even one User is set in the POS Profile, other Users cannot use this POS Profile for retail transactions.
Setting POS Profile as default: On ticking the Default checkbox in the table, the current POS Profile becomes the default POS Profile for that User. So, the next time the User logs into the system, the POS Profile will be set by default.

Note: If you specify a particular User, the POS setting will be applied only to that User. If the User option is left blank, the setting will be set for all users. To understand how POS works, visit the Point of Sale page.
Payment Methods

Set up payment modes in the table; the default will be cash if nothing is set here. Only the modes set here will be available when using POS. After adding payment modes, set one of them as the default payment method by ticking the checkbox.
To allow Payment Methods on Return Invoices, set the “Allow in Returns”.
Configurations

The Configurations section in the POS Profile applies only to the Point of Sale (POS) view in ERPNext. These settings control the behavior, layout, and user experience of the POS interface and do not affect standard Sales Invoices or other views.
- Hide images: By default, POS displays items in Grid View. However, enabling “Hide images” configuration will switch to List View.
- Ignore Pricing Rule: Any active Pricing Rule will be ignored for this POS Profile.
- Hide unavailable Items: Items with non-positive stock will not be displayed.
- Allow User to Edit Rate: Users will be allowed to edit the rate on the POS Item Detail View.
- Automatically Add Filtered Item To Cart: When enabled, the filtered item is automatically added to the POS cart without manual selection. Applies only to the POS view.
- Allow User to Edit Discount: Users will be allowed to edit the discount on the POS Item Detail View.
- Validate Stock on Save: Validate stock availability on saving the Invoice.
- Set Grand Total to Default Payment Method: Auto-set Grand Total to Default Payment Method during checkout.
- Print Receipt on Order Complete: Open Print Preview for Invoice automatically on Order Complete.
- Allow Partial Payment: Allow partial payment to POS Invoices.
- Action on New Invoice: Action on clicking the New Invoice Button on POS in case of an unsaved invoice for an ongoing Order.
- Always Ask: Ask the user if they want to save the ongoing invoice or discard the invoice and load a new invoice.
- Save Changes and Load New Invoice: Auto-save the ongoing incomplete invoice and load a new invoice.
- Discard Changes and Load New Invoice: Discard the incomplete invoice and load a new invoice.
Setting Item Group and Customer Group
On setting an Item Group/Customer Group in a POS Profile, the group will be automatically selected when making transactions with the POS Profile.

Print Settings

- Print Format: You can set a Print Format which will decide what the layout of the printed document will look like. To know more, visit the Print Format page.
- Letterhead: You can print your POS Sales Invoice on your Company's letterhead. Know more here.
- Print Headings: POS Sales Invoice headings can also be changed when printing the document. For example, the heading can be 'Invoice', or 'Bill'. You can do this by selecting a Print Heading. To create new Print Headings go to: Home > Settings > Printing > Print Heading. Know more here.
- Terms and Conditions: There may be certain terms and conditions on the Item you're selling, these can be applied here. To know about adding Terms and Conditions, click here.
Accounting
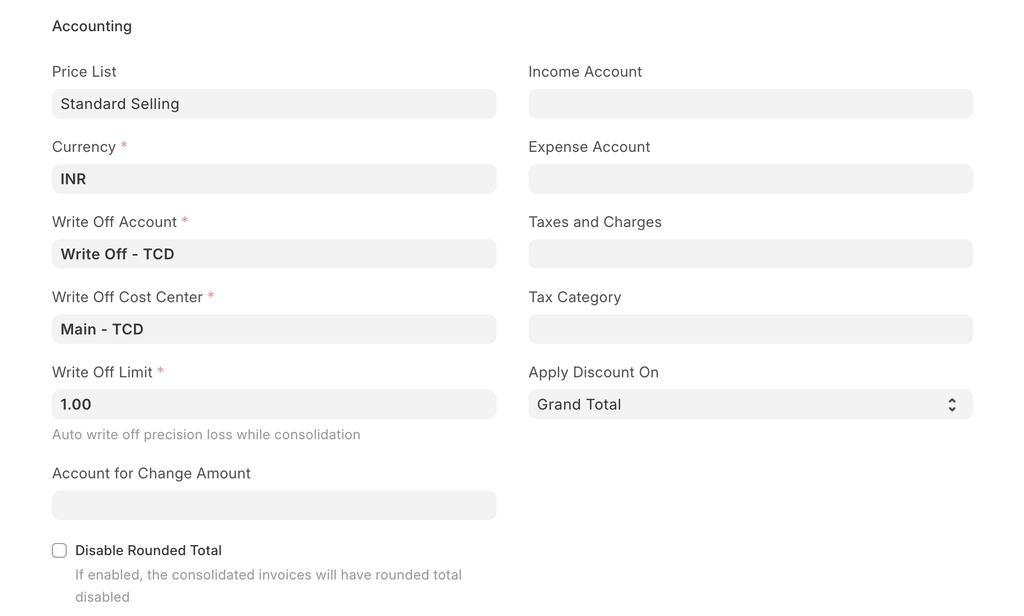
- Price List: A Price List stores the Item Prices. Setting a Price List here will fetch the Item Prices for the current POS Profile from that Price List.
- Currency: By default, this will be set according to the Company's default currency. However, you can change it. In case you change the currency, remember to change the accounts too.
- Taxes and Charges: Selecting a Sales Taxes and Charges Template or Purchase Taxes and Charges Template here will automatically apply the taxes and charges to the POS transaction.
- Apply Discount On: Here you can set whether the discount is to be applied on the Grand Total (pre tax amount) or the Net Total (post tax amount).
- Tax Category: On selecting a Tax Category here, the Tax Rules associated with the Tax Category will be applied to each transaction performed from this POS Profile.
The following accounts can be set so that the general ledger is updated accordingly:
- Account for Change Amount
- Write Off Account
- Write Off Cost Center
- Income Account
- Expense Account
Accounting Dimensions
Accounting Dimensions lets you tag transactions based on a specific Territory, Branch, Customer, etc. This helps in viewing accounting statements separately based on the criteria selected. To know more, visit the Accounting Dimensions page.
Note: Cost Center is treated as a dimension by default.