

















A Customer represents a person, business, or other organization that buys goods or services from you. The Customer master gives quotations, orders, invoices, payments, projects, support records, and reports one consistent party reference.
Create a separate Customer for each independently billed party. Store people and locations as linked Contacts and Addresses instead of putting every detail in the Customer name.
Before you begin
Confirm the following before creating the record:
- How Customer IDs should be generated in Selling Settings. ERPNext can use the Customer name or a naming series.
- The correct Customer Group, such as Commercial, Government, or a group designed for your reporting structure.
- The Customer's Territory, billing currency, price list, payment terms, and expected credit policy.
- Whether the party is a company, individual, partnership, or one of your own companies.
You need permission to create Customer records. Additional permissions may be required to create linked Addresses and Contacts or configure accounting defaults.
Create a Customer
- Open the Customer list from Selling > Customer.
- Select Add Customer.
- Enter the Customer Name.
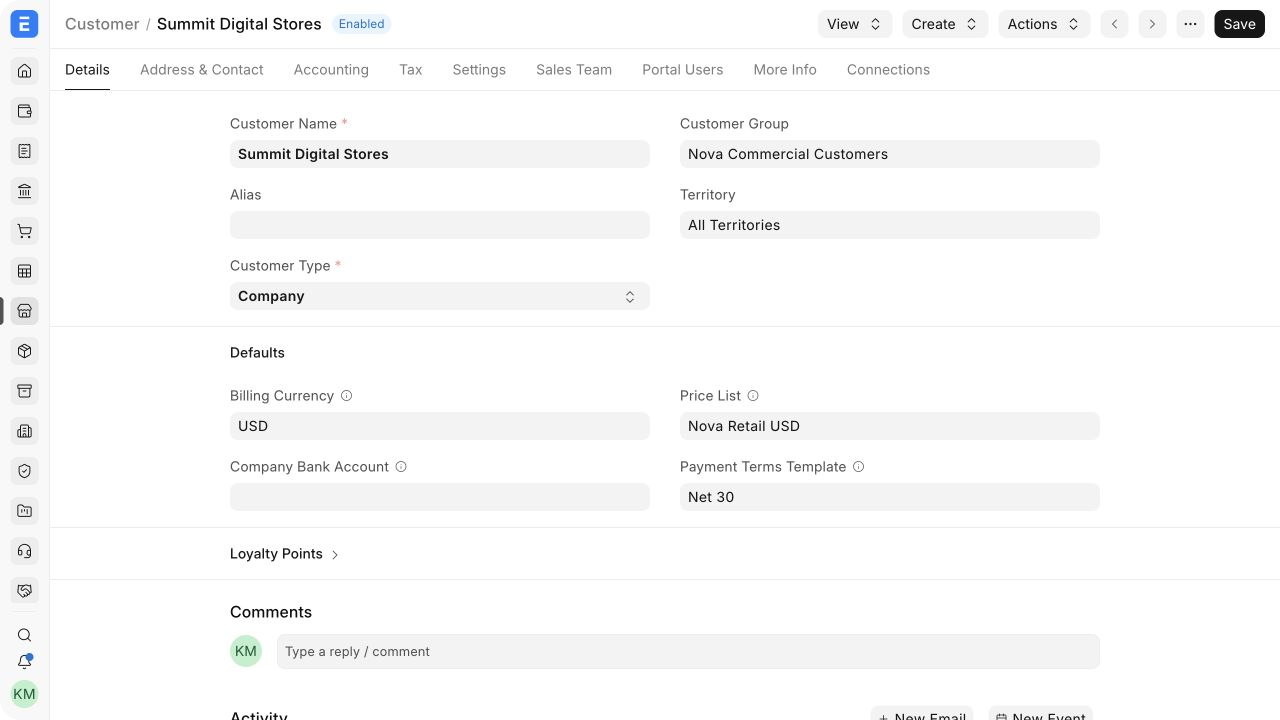
- Select the Customer Type, Customer Group, and Territory.
- Add the billing currency, price list, and payment terms when they should default on this Customer's transactions.
- Save the Customer.
After saving, add at least one billing Address and the primary Contact. This makes the correct location and person available when users create quotations and other sales transactions.
Example
Nova Electronics Trading creates Summit Digital Stores as a Company Customer in its commercial customer group. The Customer uses USD, the Nova Retail USD price list, and Net 30 payment terms. Its billing office, receiving warehouse, and purchasing manager are stored as linked records.
Alternative ways to create a Customer
- From a Lead: Convert a qualified Lead so the Customer remains connected to the earlier sales activity.
- During a sales transaction: Depending on permissions and configuration, create a Customer from the Customer link field without leaving the transaction.
- Data import: Use the Data Import tool for a reviewed batch of Customers. Import linked Contacts and Addresses separately and verify their Dynamic Link values.
- Integration: Create Customers through an approved API or integration when another system owns customer onboarding. Apply the same validation and duplicate checks as manual entry.
Avoid creating another Customer merely because a Contact or delivery location changes. One Customer can have several Contacts and Addresses.
Important fields and what they mean
| Field | What it controls |
|---|---|
| Customer Name | The party's readable name. It may also become the Customer ID when naming by Customer Name is enabled. |
| Customer Type | Distinguishes Company, Individual, and Partnership Customers and can affect naming and reporting. |
| Customer Group | Classifies Customers for defaults, reporting, permissions, and pricing decisions. |
| Territory | Places the Customer in the sales territory hierarchy for analysis and assignment. |
| Billing Currency | Defaults the transaction currency on new sales documents for this Customer. |
| Price List | Selects the default selling Price List used to retrieve Item prices. |
| Payment Terms Template | Applies the default Payment Terms schedule to new orders and invoices. |
| Default Account | Posts this Customer's receivable entries to a specific company account instead of the company default. |
| Credit Limit | Blocks applicable transactions when outstanding exposure exceeds the configured company limit. |
| Disabled | Prevents users from selecting the Customer in new transactions without deleting its history. |
| Is Internal Customer | Identifies a Customer representing one of your companies for inter-company transactions. |
Leave optional defaults empty when they vary by transaction. A user can select an appropriate value on the sales document instead.
Add addresses and contacts
Addresses and Contacts are independent records linked to the Customer. This lets a Customer have several offices, delivery locations, buyers, and accounts-payable contacts without duplicating the Customer.
- Open the saved Customer and select Address & Contact.
- Select New Address, enter the location, choose its type, and mark the primary or shipping address when appropriate.
- Select New Contact, enter the person's name and role, then add the primary email address and phone number.
- Select the Customer's primary Address and Contact when ERPNext does not assign them automatically.
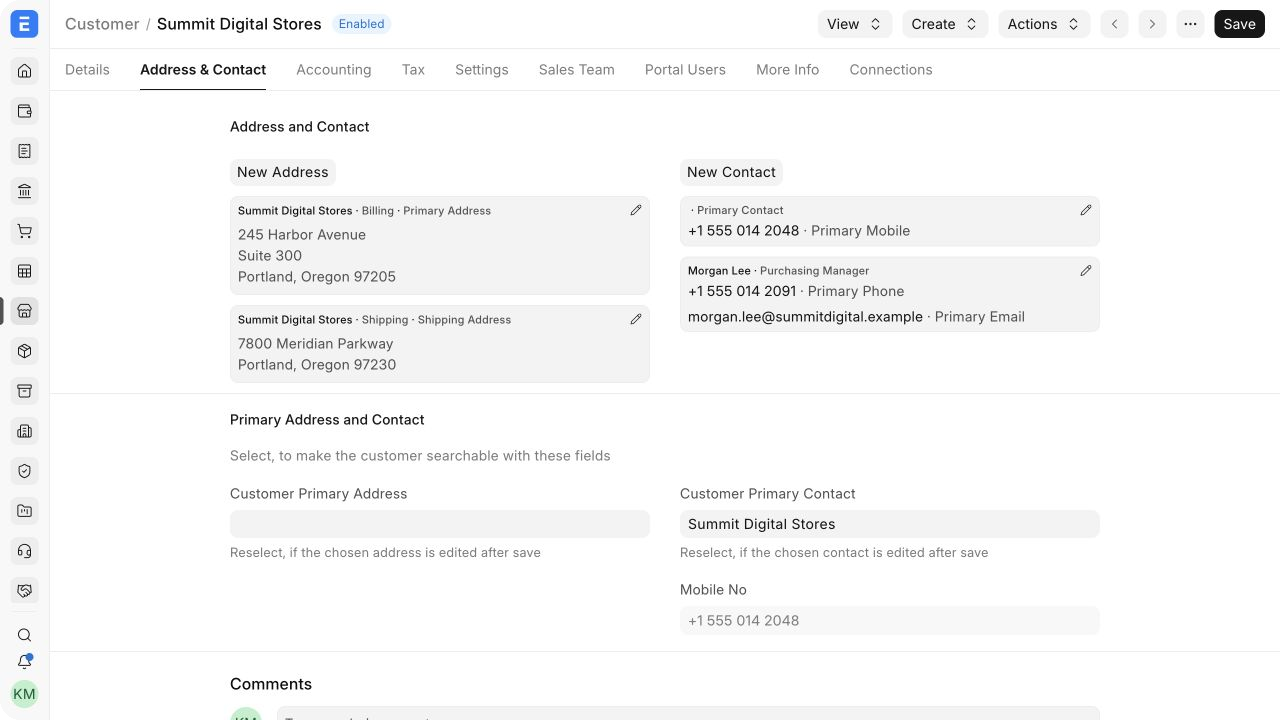
Review primary flags carefully. Sales documents can fetch the primary billing and shipping details, while users can still choose another linked record for a specific transaction.
Configure sales, tax, and accounting defaults
Use Customer-level defaults only when they consistently apply to this party:
- Set a Tax Category or regional Tax Withholding Category when required by your tax configuration. See Tax Withholding Category for the applicable rules.
- Assign a Sales Person or sales team and ensure contribution percentages total 100%.
- Add a Sales Partner and commission rate when an external partner influences the sale.
- Select a Loyalty Program when the Customer earns or redeems loyalty points.
- Use the same Customer across companies. Add a company-specific receivable account only when it is required by your Chart of Accounts.
ERPNext normally posts Customer receivables to the company's default Debtors account, so a separate ledger is not required for every Customer. A company-specific account is an exception, not a prerequisite.
Credit limits and payment controls
Add one credit-limit row for each company that needs a limit. ERPNext evaluates submitted exposure against that amount according to the configured credit-control behaviour. Keep the Bypass credit limit check at sales order option cleared when orders should be checked before invoicing.
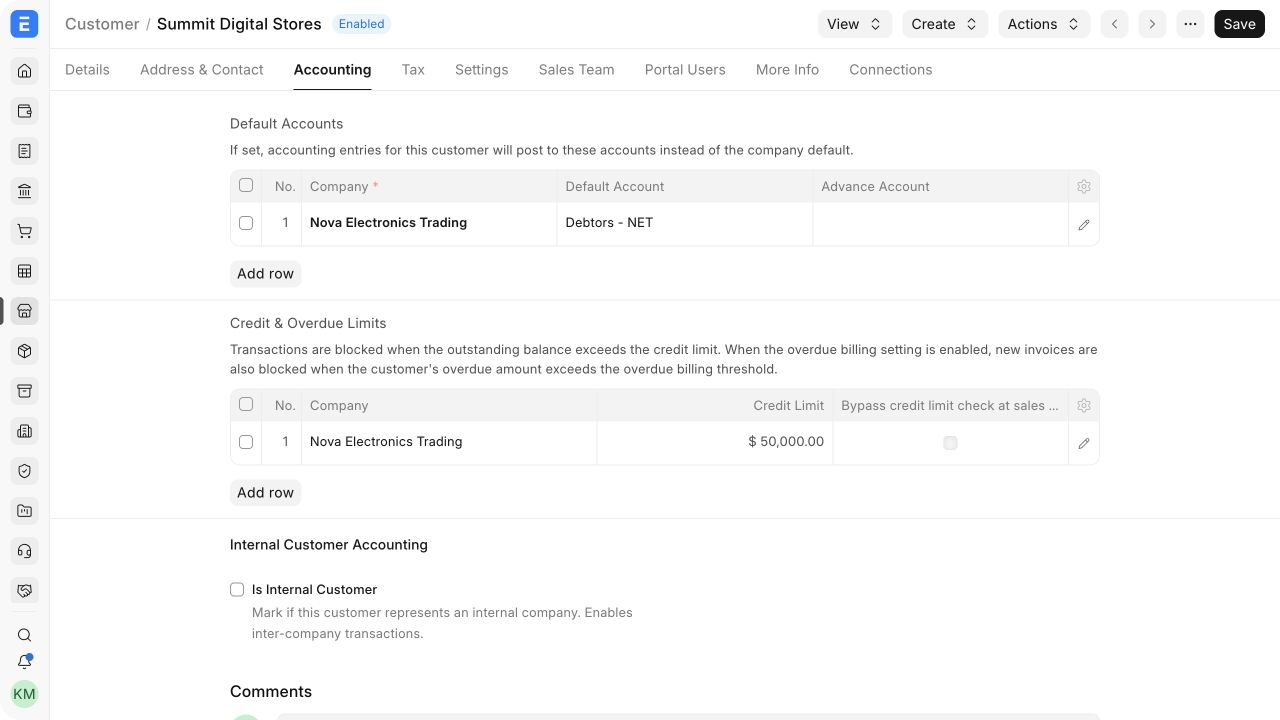
Use the dedicated Credit Limit guidance when defining the policy. The payment terms template controls when amounts are due; it does not increase the Customer's credit limit.
If Selling Settings require a Sales Order or Delivery Note before invoicing, Customer-level settings can allow direct Sales Invoices for an approved exception. Use these overrides deliberately because they change the normal sales controls for this Customer.
Save and next steps
Customer is a master record and is saved rather than submitted. After saving:
- create a Quotation, Sales Order, or Sales Invoice;
- review the Customer dashboard and Connections for linked transactions;
- use Accounting Ledger to inspect entries for this party; and
- use the Accounts Receivable report to review outstanding invoices.
Changes to defaults affect newly created documents. Existing submitted transactions keep the values with which they were posted.
Customer types and availability
| Value | When to use it |
|---|---|
| Company | A registered business or organization acting as the buying party |
| Individual | A person buying in their own capacity |
| Partnership | A partnership that should be distinguished from other organizations |
| Enabled | Available for selection in new transactions |
| Disabled | Retained for history but unavailable for new transactions |
| Internal Customer | Represents another company in the same organization for inter-company processing |
Do not delete a Customer merely because the relationship has ended. Disable it to preserve the audit trail and prevent new use.
Troubleshooting
| Problem | What to check |
|---|---|
| The Customer already exists | Search by Customer name, primary email, mobile number, tax ID, and linked Address before creating another record. |
| Currency or price list does not default | Confirm the Customer defaults and verify that the selected price list supports the required currency. |
| The wrong address appears on a transaction | Check the linked Address type and primary or shipping flags, then reselect the address on the Customer if it was edited. |
| A transaction is blocked by credit control | Review the company credit limit, outstanding invoices, overdue settings, and any permitted bypass. |
| A user cannot select the Customer | Confirm that the Customer is not disabled and that the user has the required role and permissions. |
| Accounting posts to the wrong receivable account | Check the company-specific Customer account and the company's default receivable account. |
Frequently asked questions
Can one Customer have multiple addresses and contacts?
Yes. Link each location and person to the same Customer, then mark the normal billing, shipping, and primary records.
Should every Customer have a separate receivable ledger?
No. ERPNext normally uses the company's shared Debtors account while tracking the Customer as the accounting party. Configure a separate account only for a specific accounting requirement.
Can two Customers have the same name?
When naming by Customer Name is enabled, ERPNext keeps IDs unique by adding a suffix when required. Search for an existing party before accepting the duplicate.
Can I stop new sales without deleting the Customer?
Yes. Enable Disabled. Historical documents and ledger entries remain connected to the Customer.
Can the same Customer be used by multiple companies?
Yes. Company-specific accounts and credit limits are stored in separate rows on the Customer.